rksoftware

Visual Studio とか C# とかが好きです

Windows フォームアプリケーションで最新機能に対応する XAML Islands

Windows のバージョン 1809 で XAML Islands (MS のドキュメントの翻訳では XAML 諸島) という機能が使えるようになりました。
Windows 10 の UI コントロール (UWP のコントロール) が WPF や Windows Forms アプリケーションで使える夢の機能です。

詳細は公式ドキュメントへ

WPF で試した記事はこちら

当時と今では状況も違うはずですし今度は Windows フォームアプリケーションで試してみます。

■ NuGet パッケージのインストール

まずは、NuGet で Microsoft.Toolkit.Forms.UI.XamlHost をインストールします。
f:id:rksoftware:20190103214126j:plain

以前は、プレリリースを含めるのチェックが必要だった記憶がありますが、今は不要のようです。
ダウンロード件数がとても気になりますが今は気にしないでおきましょう。

■ デザイナで XamlHost コントロールを配置

NuGet パッケージをインストールすると、XamlHost コントロールが使えるようになるので、デザイナで配置します。
f:id:rksoftware:20190103214146j:plain

■ 参照の設定

以前は 6 つほど参照を追加した記憶がありますが、今回は二つだけで済みました。

ファイル 場所
Windows.Foundation.UniversalApiContract.winmd C:\Program Files (x86)\Windows Kits\10\References<sdk version>\Windows.Foundation.UniversalApiContract<version>
Windows.WinMD C:\Program Files (x86)\Windows Kits\10\UnionMetadata\Facade

参考
https://docs.microsoft.com/ja-jp/windows/uwp/porting/desktop-to-uwp-enhance#first-set-up-your-project

■ プロパティを設定

XamlHost コントロールは、UWP のコントロールを入れるられるコンテナのようなものです。実際に中に配置するコントロールを設定します。今回もまずは ProgressRing を表示してみます。
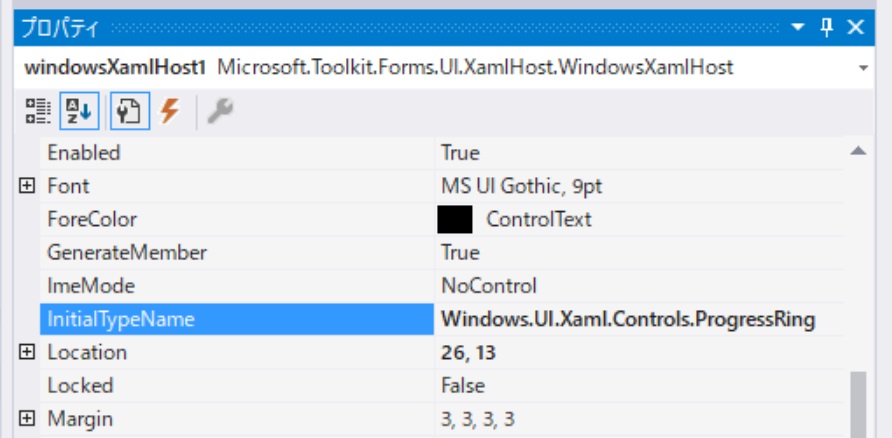
XamlHost プロパティを開いて InitialTypeNameWindows.UI.Xaml.Controls.ProgressRing と設定します。
f:id:rksoftware:20190103214206j:plain

InitialTypeName で指定したコントロールのプロパティをデザイナから設定する手段はありません。実際に生成されたイベントの中で設定をします。
XamlHost の ChildChanged イベントにハンドラを設定します。
f:id:rksoftware:20190103214239j:plain

デザインのコード

デザインのコードは次のように設定しました。

// 
// windowsXamlHost1
// 
this.windowsXamlHost1.AutoSizeMode = System.Windows.Forms.AutoSizeMode.GrowOnly;
this.windowsXamlHost1.InitialTypeName = "Windows.UI.Xaml.Controls.ProgressRing";
this.windowsXamlHost1.Location = new System.Drawing.Point(40, 10);
this.windowsXamlHost1.Name = "windowsXamlHost1";
this.windowsXamlHost1.Size = new System.Drawing.Size(300, 200);
this.windowsXamlHost1.TabIndex = 0;
this.windowsXamlHost1.Text = "windowsXamlHost1";
this.windowsXamlHost1.ChildChanged += new System.EventHandler(this.windowsXamlHost1_ChildChanged);

イベントハンドラ

イベントハンドラの中で ProgressRing のプロパティを設定します。

private void windowsXamlHost1_ChildChanged(object sender, EventArgs e)
{
    var host = (Microsoft.Toolkit.Forms.UI.XamlHost.WindowsXamlHost)sender;
    var progressRing = (Windows.UI.Xaml.Controls.ProgressRing)host.Child;
    if (progressRing != null)
    {
        progressRing.IsActive = true;
        progressRing.Width = 300;
        progressRing.Height = 200;
    }
}

■ 実行

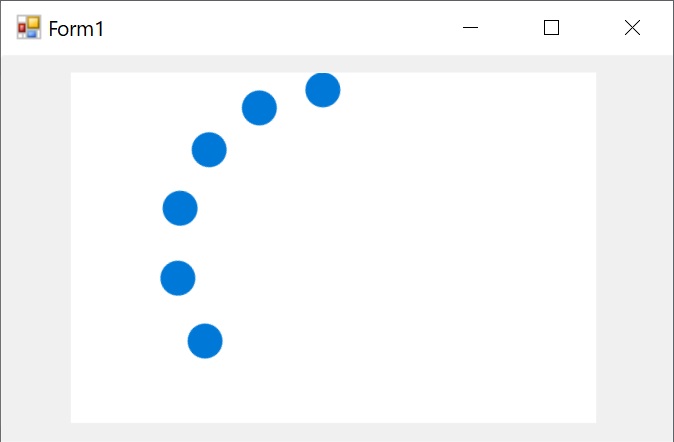
実行してみると、UWP の ProgressRing が表示されました。これで時間のかかる処理を行う際も安心ですね。
f:id:rksoftware:20190103214309j:plain

■ InkCanvas

UWP のコントロールが使えると聞いて皆が気になるあのコントロール InkCanvas も試してみます。
XamlHost コントロールをもう一つ配置して各種設定をして行きます。コントロールの名前は自動で設定された windowsXamlHost2 としています。

デザインのコード

namespace WindowsFormsApp1
{
    partial class Form1
    {
        /// <summary>
        /// 必要なデザイナー変数です。
        /// </summary>
        private System.ComponentModel.IContainer components = null;

        /// <summary>
        /// 使用中のリソースをすべてクリーンアップします。
        /// </summary>
        /// <param name="disposing">マネージド リソースを破棄する場合は true を指定し、その他の場合は false を指定します。</param>
        protected override void Dispose(bool disposing)
        {
            if (disposing && (components != null))
            {
                components.Dispose();
            }
            base.Dispose(disposing);
        }

        #region Windows フォーム デザイナーで生成されたコード

        /// <summary>
        /// デザイナー サポートに必要なメソッドです。このメソッドの内容を
        /// コード エディターで変更しないでください。
        /// </summary>
        private void InitializeComponent()
        {
            this.windowsXamlHost1 = new Microsoft.Toolkit.Forms.UI.XamlHost.WindowsXamlHost();
            this.windowsXamlHost2 = new Microsoft.Toolkit.Forms.UI.XamlHost.WindowsXamlHost();
            this.SuspendLayout();
            // 
            // windowsXamlHost1
            // 
            this.windowsXamlHost1.AutoSizeMode = System.Windows.Forms.AutoSizeMode.GrowOnly;
            this.windowsXamlHost1.InitialTypeName = "Windows.UI.Xaml.Controls.ProgressRing";
            this.windowsXamlHost1.Location = new System.Drawing.Point(40, 10);
            this.windowsXamlHost1.Name = "windowsXamlHost1";
            this.windowsXamlHost1.Size = new System.Drawing.Size(300, 200);
            this.windowsXamlHost1.TabIndex = 0;
            this.windowsXamlHost1.Text = "windowsXamlHost1";
            this.windowsXamlHost1.ChildChanged += new System.EventHandler(this.windowsXamlHost1_ChildChanged);
            // 
            // windowsXamlHost2
            // 
            this.windowsXamlHost2.AutoSizeMode = System.Windows.Forms.AutoSizeMode.GrowOnly;
            this.windowsXamlHost2.InitialTypeName = "Windows.UI.Xaml.Controls.InkCanvas";
            this.windowsXamlHost2.Location = new System.Drawing.Point(440, 10);
            this.windowsXamlHost2.Name = "windowsXamlHost2";
            this.windowsXamlHost2.Size = new System.Drawing.Size(300, 200);
            this.windowsXamlHost2.TabIndex = 1;
            this.windowsXamlHost2.Text = "windowsXamlHost2";
            this.windowsXamlHost2.ChildChanged += new System.EventHandler(this.windowsXamlHost2_ChildChanged);
            // 
            // Form1
            // 
            this.AutoScaleDimensions = new System.Drawing.SizeF(6F, 12F);
            this.AutoScaleMode = System.Windows.Forms.AutoScaleMode.Font;
            this.ClientSize = new System.Drawing.Size(784, 221);
            this.Controls.Add(this.windowsXamlHost2);
            this.Controls.Add(this.windowsXamlHost1);
            this.Name = "Form1";
            this.Text = "Form1";
            this.ResumeLayout(false);

        }

        #endregion

        private Microsoft.Toolkit.Forms.UI.XamlHost.WindowsXamlHost windowsXamlHost1;
        private Microsoft.Toolkit.Forms.UI.XamlHost.WindowsXamlHost windowsXamlHost2;
    }
}

イベントハンドラ

using System;
using System.Windows.Forms;

namespace WindowsFormsApp1
{
    public partial class Form1 : Form
    {
        public Form1()
        {
            InitializeComponent();
        }

        private void windowsXamlHost1_ChildChanged(object sender, EventArgs e)
        {
            var host = (Microsoft.Toolkit.Forms.UI.XamlHost.WindowsXamlHost)sender;
            var progressRing = (Windows.UI.Xaml.Controls.ProgressRing)host.Child;
            if (progressRing != null)
            {
                progressRing.IsActive = true;
                progressRing.Width = 300;
                progressRing.Height = 200;
            }
        }

        private void windowsXamlHost2_ChildChanged(object sender, EventArgs e)
        {
            var host = (Microsoft.Toolkit.Forms.UI.XamlHost.WindowsXamlHost)sender;
            var inkCanvas = (Windows.UI.Xaml.Controls.InkCanvas)host.Child;
            if (inkCanvas != null)
            {
                inkCanvas.Width = 300;
                inkCanvas.Height = 200;
                inkCanvas.InkPresenter.InputDeviceTypes =
                    Windows.UI.Core.CoreInputDeviceTypes.Mouse
                    | Windows.UI.Core.CoreInputDeviceTypes.Pen;
            }
        }
    }
}

InlCanvas にマウスで書けるように inkCanvas.InkPresenter.InputDeviceTypes = Windows.UI.Core.CoreInputDeviceTypes.Mouse | Windows.UI.Core.CoreInputDeviceTypes.Pen; という設定を行っています。

■ 実行

実行して文字を書いてみました。これで最新機能を実装する Windows フォームアプリケーションという要件があっても安心ですね。
f:id:rksoftware:20190103214335j:plain

■ おまけ .NET Core 3.0

以前に .NET Core 3.0 で Windows フォームアプリケーションを作る記事を書きました。
デスクトップアプリも .NET Core で作る時代が近づいています。XAML 諸島が .NET Core でも使えるか試してみました。
結果は

エラー NU1202 パッケージ Microsoft.Toolkit.Forms.UI.XamlHost 5.0.1 は netcoreapp3.0 (.NETCoreApp,Version=v3.0) / win-x64 と互換性がありません。 パッケージ Microsoft.Toolkit.Forms.UI.XamlHost 5.0.1 がサポートするもの: net462 (.NETFramework,Version=v4.6.2)

まだ使えないようです。残念。

Windows フォーム手書き時の注意 AutoScaleDimensions 設定

前回、Windows フォームアプリケーションで、Form.Designer.cs ファイルを手編集する記事を書きました。
その中で一点、良く知らなくてコメントにしてごまかした行がありました。

// 
// Form1
// 
this.AutoScaleDimensions = new System.Drawing.SizeF(12F, 25F);

公式ドキュメントもありますが読んでも良くわからなかったので確認してみました。

■ High DPI 環境での設定

この設定は High DPI 環境で意味を持つ設定でした。
正直、High DPI 環境で Windows フォームアプリケーションの開発をした経験がなかったので今まで意識したことがなかったです。さらに、High DPI 環境での動作ではなく、開発時に関係する設定のようでこれがまたレア度が高いですね。

Visual Studio の動作環境の設定

この値が何を意味しているかというと、Visual Studio (フォームのデザイナ) がどんな表示スケール設定で動作していたかを記録しているもののようです。
説明が難しいので実例を挙げてみましょう。

開発PCの表示スケール 100% 150% 175% 200%
デザイナーで設定される AutoScaleDimensions (6F,12F) (10F, 18F) (11F, 21F) (13F, 24F)
100% との比率 (100%, 100%) (166%, 150%) (183%, 175%) (216%, 200%)
100% が (6.5F, 12F) とした場合の比率 (100%, 100%) (153%, 150%) (169%, 175%) (200%, 200%)
サイズを (200,200) に設定したコントロールの実行時の実サイズ (200,200) (120, 133) (109,114) (92, 100)

各二つ目の数字 ( (Width, Hight) で (Height の値) です) を見ると分かりやすいですね。
デザイナーが表示スケールの影響を受けているのでその分 戻した 値を使わなくてはならないので、デザイナーを操作している環境の設定を保持しているということのようです。

正直これは難しいですね。環境の違う複数の開発者でソースを共有するのも難しくなりそうです。

■ 対策 手書きする場合

.NET Core 3.0 でテンプレートから生んだ Form.Designer.cs では (12F, 25F) という設定になっていました。
しかし、この値を考慮しながら各コントロールのサイズを設定することは現実的ではないと思います。この設定を消してしまうもしくは、100% の場合の値 (6F, 12F) に設定しておくのが良いでしょう。

■ デザイナーを使う場合

.NET Framework の場合はデザイナーが使えますし、普通はデザイナーも併用してコントロールを配置すると思います。しかしデザイナーを使うと共有時に面倒...そんな状況の対策も Visual Studio なら大丈夫。High DPI 環境でデザイナーを開くと、デザイナー上部に次のようなメッセージが表示されます。
f:id:rksoftware:20190102212010j:plain

日本語環境ではこんな感じ。
f:id:rksoftware:20190102212024j:plain

100% のスケールで Visual Studio を再起動します をクリックすると、Visual Studio 再起動してスケールが 100% であるものとしてコントロールを設定できます。
素晴らしい。さすが Visual Studio ですね。

■ まとめ

Windows フォームアプリケーションのデザイナーは難しいですね。

デザイナがなくても問題なし .NET Core 3.0 で Windows フォームアプリケーションを作る

.NET Core 3.0 で Windows フォームアプリケーションを作るには、.NET Framework と同じようにまずプロジェクト(ソリューション)を作ります。
.NET Core 3.0 用のフォームのデザイナがないことが話題ですが、大丈夫です。対策となる大きく2つの手法をこの記事で書いています。

対策となる2種類の手法

  • コードビハインドで配置する
  • デザイナーが忘れられない!

■ プロジェクトの作成

対策は後述するので、まずはプロジェクトを作成して行きます。

プロジェクト作成コマンド

dotnet new winforms -n winformapp

この例では、 -n でプロジェクト名を winformapp と指定しています。プロジェクト名のフォルダが作られ、その中にプロジェクトが作成されています。
プロジェクトの場所へフォルダを移動します。

cd winformapp

ただ、ここまでの手順ではソリューションは作られていないのでソリューションも作っておきましょう。

ソリューション作成コマンド

dotnet new sln

winformapp.sln ファイルが作成されますが、まだプロジェクトが含まれていないのでプロジェクトをソリューションに追加します。

dotnet sln add winformapp.csproj

これでソリューションに winformapp プロジェクトが追加されました。

作成したソリューションを Visual Studio 2019 Preview で開きます。

  • Visual Studio 2019 Preview を起動します
  • [ プロジェクトやソリューションを開く ] から作成した winformapp.sln を選択します。

■ デバッグ実行

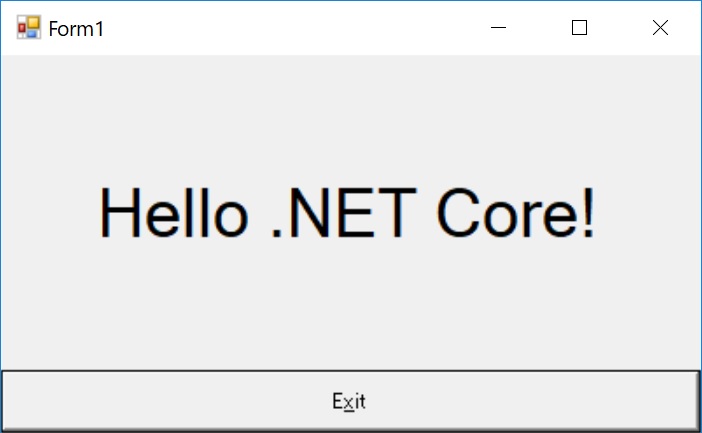
作成した winformapp プロジェクトはそのまま実行可能です。いったん実行してみましょう。 f:id:rksoftware:20190101223611j:plain
ここから色々とコントロールを配置してアプリを作って行くわけですが、残念ながらコントロールを配置するためのデザイナーが用意されていません。
しかし、まだあきらめるタイミングではありません。Windows フォームアプリケーションはデザイナーがなければ作らないというものではありません。

■ パターン1 コードビハインドで配置する

コードビハインドでコントロールを new して配置して行けば簡単にコントロールを配置できます。
Form1.cs にコードを書いていきます。

using System;
using System.Drawing;
using System.Windows.Forms;

namespace winformapp
{
    public partial class Form1 : Form
    {
        // 配置したコントロールを保持するメンバー
        Panel panel;
        TextBox textBox;
        Button button;

        public Form1()
        {
            InitializeComponent();

            // 自分でコントロールを生成し配置する
            CreateAndLayoutControls();
        }

        // 自分でコントロールを生成し配置する
        void CreateAndLayoutControls()
        {
            // パネルを生成し Form の上に乗せる(背景色はアジュール)
            this.Controls.Add(panel = new Panel
            {
                Location = new Point(10, 10),
                BackColor = Color.Azure,
                Size = new Size(300,100),
            });

            // テキストボックスを生成しパネルの上に乗せる
            panel.Controls.Add(textBox = new TextBox
            {
                Location = new Point(5,0),
                Size = new Size(200,22),
            });

            // ボタンを生成しパネルの上に乗せる(背景色はクリムゾン)
            panel.Controls.Add(button = new Button
            {
                Location = new Point(5, 23),
                Size = new Size(200, 22),
                Text = "ボタン",
                BackColor = Color.Crimson,
            });

            // ボタンクリック時のイベントハンドラを設定する
            button.Click += Button_Click;

            // パネルが表示されるよう最前面に移動
            panel.BringToFront();
        }

        // ボタンクリックのイベントハンドラ
        private void Button_Click(object sender, EventArgs e)
        {
            // テキストボックスに入力されている文字列をメッセージボックスで表示
            MessageBox.Show(textBox.Text);
        }

        private void buttonExit_Click(object sender, EventArgs e)
        {
            Application.Exit();
        }
    }
}

ポイントは次のパネル生成部分のコードです。

// パネルを生成し Form の上に乗せる(背景色はアジュール)
this.Controls.Add(panel = new Panel
{
    Location = new Point(10, 10),
    BackColor = Color.Azure,
    Size = new Size(300,100),
});

Windows フォームのコントロールは当たり前と言えば当たり前ですが、new してインスタンス化できます。つまり普通に new して Form に Add してやれば画面に表示されます。
あとはこれを配置したいコントロール分繰り返せば OK です。簡単ですね。

他のポイントとしては

// 配置したコントロールを保持するメンバー
Panel panel;
TextBox textBox;
Button button;

というメンバー宣言でしょうか。デザイナーで配置した場合と同じように、コードビハインドでコントロールを操作するためにメンバーにコントロールのインスタンスを保持しています。これはデザイナーで配置した場合もデザイナーが同様のコードを自動で作成してくれているものです。

実行

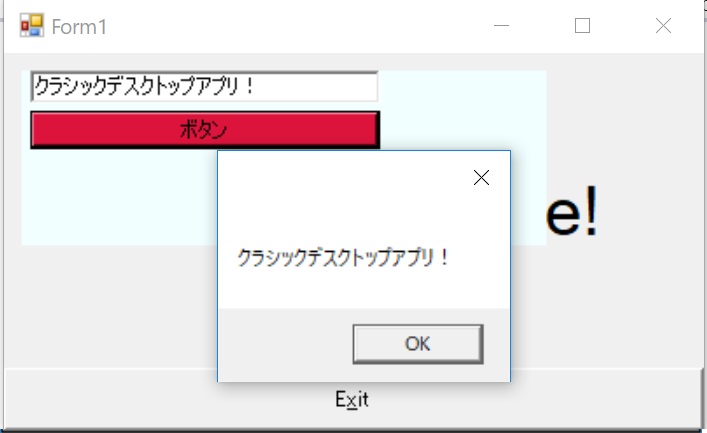
実行するとこのように、パネルの上にテキストボックスとボタンが置かれ、ボタンクリックのイベントも動作します。
f:id:rksoftware:20190101223634j:plain
f:id:rksoftware:20190101223650j:plain

■ パターン2 デザイナーと同じがいい!

コードでコントロールを配置するのに違和感がありどうしてもデザイナーがいいという方も大丈夫です。Windows フォームアプリケーションのデザイナーが生成するコードはシンプルなので誰でも簡単に書けます。
まずは、テンプレートで生まれたコードを見てみましょう。

namespace winformapp
{
    partial class Form1
    {
        /// <summary>
        /// Required designer variable.
        /// </summary>
        private System.ComponentModel.IContainer components = null;

        /// <summary>
        /// Clean up any resources being used.
        /// </summary>
        /// <param name="disposing">true if managed resources should be disposed; otherwise, false.</param>
        protected override void Dispose(bool disposing)
        {
            if (disposing && (components != null))
            {
                components.Dispose();
            }
            base.Dispose(disposing);
        }

        #region Windows Form Designer generated code

        /// <summary>
        /// Required method for Designer support - do not modify
        /// the contents of this method with the code editor.
        /// </summary>
        private void InitializeComponent()
        {
            this.label1 = new System.Windows.Forms.Label();
            this.buttonExit = new System.Windows.Forms.Button();
            this.SuspendLayout();
            // 
            // label1
            // 
            this.label1.Dock = System.Windows.Forms.DockStyle.Fill;
            this.label1.Font = new System.Drawing.Font("Microsoft Sans Serif", 28.125F, System.Drawing.FontStyle.Regular, System.Drawing.GraphicsUnit.Point, ((byte)(0)));
            this.label1.Location = new System.Drawing.Point(0, 0);
            this.label1.Name = "label1";
            this.label1.Size = new System.Drawing.Size(800, 376);
            this.label1.TabIndex = 1;
            this.label1.Text = "Hello .NET Core!";
            this.label1.TextAlign = System.Drawing.ContentAlignment.MiddleCenter;
            // 
            // buttonExit
            // 
            this.buttonExit.Dock = System.Windows.Forms.DockStyle.Bottom;
            this.buttonExit.Location = new System.Drawing.Point(0, 376);
            this.buttonExit.Name = "buttonExit";
            this.buttonExit.Size = new System.Drawing.Size(800, 74);
            this.buttonExit.TabIndex = 1;
            this.buttonExit.Text = "E&xit";
            this.buttonExit.UseVisualStyleBackColor = true;
            this.buttonExit.Click += new System.EventHandler(this.buttonExit_Click);
            // 
            // Form1
            // 
            this.AutoScaleDimensions = new System.Drawing.SizeF(12F, 25F);
            this.AutoScaleMode = System.Windows.Forms.AutoScaleMode.Font;
            this.ClientSize = new System.Drawing.Size(800, 450);
            this.Controls.Add(this.label1);
            this.Controls.Add(this.buttonExit);
            this.Name = "Form1";
            this.Text = "Form1";
            this.ResumeLayout(false);

        }

        #endregion

        private System.Windows.Forms.Label label1;
        private System.Windows.Forms.Button buttonExit;
    }
}

とても簡単ですね。大きく4つの区切りがあります。

コントロールのインスタンス保持用のメンバー宣言

一番下の部分です。ここでコントロールのインスタンスを保持するメンバーの宣言をしています。コントロールを追加したい場合、まずはここにメンバーを追加すれば良いでしょう。簡単ですね。

private System.Windows.Forms.Label label1;
private System.Windows.Forms.Button buttonExit;

コントロールのインスタンス化

戻ってコードの上の方 InitializeComponent メソッドの最初の部分です。ここで、コントロールのインスタンスを生成しています。コントロールを追加した良い場合、ここでインスタンス化すれば良いでしょう。簡単ですね。

this.label1 = new System.Windows.Forms.Label();
this.buttonExit = new System.Windows.Forms.Button();

コントロールのプロパティ

次の部分はコントロールのプロパティを設定する部分です。コントロール全てのプロパティの初期値を順に設定しています。コントロールのプロパティはここで設定すれば良いでしょう。簡単ですね。

// 
// label1
// 
this.label1.Dock = System.Windows.Forms.DockStyle.Fill;
this.label1.Font = new System.Drawing.Font("Microsoft Sans Serif", 28.125F, System.Drawing.FontStyle.Regular, System.Drawing.GraphicsUnit.Point, ((byte)(0)));
this.label1.Location = new System.Drawing.Point(0, 0);
this.label1.Name = "label1";
this.label1.Size = new System.Drawing.Size(800, 376);
this.label1.TabIndex = 1;
this.label1.Text = "Hello .NET Core!";
this.label1.TextAlign = System.Drawing.ContentAlignment.MiddleCenter;

コントロールの Add

次の部分は Form の設定をしている部分です。Form のプロパティの設定とコントロールの追加をしています。フォームへのコントロールの追加はここで行えばいいでしょう。簡単ですね。

// 
// Form1
// 
this.AutoScaleDimensions = new System.Drawing.SizeF(12F, 25F);
this.AutoScaleMode = System.Windows.Forms.AutoScaleMode.Font;
this.ClientSize = new System.Drawing.Size(800, 450);
this.Controls.Add(this.label1);
this.Controls.Add(this.buttonExit);
this.Name = "Form1";
this.Text = "Form1";
this.ResumeLayout(false);

コントロールを配置する

Form1.Designer.cs を編集してコントロールを配置してみます。

namespace winformapp
{
    partial class Form1
    {
        /// <summary>
        /// Required designer variable.
        /// </summary>
        private System.ComponentModel.IContainer components = null;

        /// <summary>
        /// Clean up any resources being used.
        /// </summary>
        /// <param name="disposing">true if managed resources should be disposed; otherwise, false.</param>
        protected override void Dispose(bool disposing)
        {
            if (disposing && (components != null))
            {
                components.Dispose();
            }
            base.Dispose(disposing);
        }

        #region Windows Form Designer generated code

        /// <summary>
        /// Required method for Designer support - do not modify
        /// the contents of this method with the code editor.
        /// </summary>
        private void InitializeComponent()
        {
            this.label1 = new System.Windows.Forms.Label();
            this.buttonExit = new System.Windows.Forms.Button();
            this.panel = new System.Windows.Forms.Panel();
            this.textBox = new System.Windows.Forms.TextBox();
            this.button = new System.Windows.Forms.Button();
            this.panel.SuspendLayout();
            this.SuspendLayout();
            // 
            // label1
            // 
            this.label1.Dock = System.Windows.Forms.DockStyle.Fill;
            this.label1.Font = new System.Drawing.Font("Microsoft Sans Serif", 28.125F, System.Drawing.FontStyle.Regular, System.Drawing.GraphicsUnit.Point, ((byte)(0)));
            this.label1.Location = new System.Drawing.Point(0, 0);
            this.label1.Name = "label1";
            this.label1.Size = new System.Drawing.Size(800, 376);
            this.label1.TabIndex = 1;
            this.label1.Text = "Hello .NET Core!";
            this.label1.TextAlign = System.Drawing.ContentAlignment.MiddleCenter;
            // 
            // buttonExit
            // 
            this.buttonExit.Dock = System.Windows.Forms.DockStyle.Bottom;
            this.buttonExit.Location = new System.Drawing.Point(0, 376);
            this.buttonExit.Name = "buttonExit";
            this.buttonExit.Size = new System.Drawing.Size(800, 74);
            this.buttonExit.TabIndex = 1;
            this.buttonExit.Text = "E&xit";
            this.buttonExit.UseVisualStyleBackColor = true;
            this.buttonExit.Click += new System.EventHandler(this.buttonExit_Click);
            // 
            // panel
            // 
            this.panel.Controls.Add(this.textBox);
            this.panel.Controls.Add(this.button);
            this.panel.BackColor = System.Drawing.Color.Azure;
            this.panel.Location = new System.Drawing.Point(10, 10);
            this.panel.Size = new System.Drawing.Size(300, 100);
            // 
            // textBox
            // 
            this.textBox.Location = new System.Drawing.Point(5, 0);
            this.textBox.Size = new System.Drawing.Size(200, 22);
            // 
            // button
            // 
            this.button.BackColor = System.Drawing.Color.Crimson;
            this.button.Location = new System.Drawing.Point(5, 23);
            this.button.Size = new System.Drawing.Size(200, 22);
            this.button.Text = "ボタン";
            this.button.Click += new System.EventHandler(this.Button_Click);
            // 
            // Form1
            // 
            //this.AutoScaleDimensions = new System.Drawing.SizeF(12F, 25F);
            this.AutoScaleMode = System.Windows.Forms.AutoScaleMode.Font;
            this.ClientSize = new System.Drawing.Size(800, 450);
            this.Controls.Add(this.panel);
            this.Controls.Add(this.label1);
            this.Controls.Add(this.buttonExit);
            this.Name = "Form1";
            this.Text = "Form1";
            this.panel.ResumeLayout(false);
            this.panel.PerformLayout();
            this.ResumeLayout(false);

        }

        #endregion

        private System.Windows.Forms.Label label1;
        private System.Windows.Forms.Button buttonExit;
        private System.Windows.Forms.Panel panel;
        private System.Windows.Forms.TextBox textBox;
        private System.Windows.Forms.Button button;
    }
}

こんな感じで書けば、デザイナーなしでもコントロールを配置できます。簡単ですね。
是非チャレンジしてみてください。

2.0 から始める C# ~ 入門/再入門 ゆるふわ勉強会 を開催しました。

2.0 から始める C# ~ 入門/再入門 ゆるふわ勉強会 を開催しました。 C# 入門者/再入門者向けのゆるふわな勉強会です。

当日は年末の忙しい時期。皆さんいろいろと予定があったかと思いますが、この会を優先した多くの方に参加をしていただけました。 誠にありがとうございました。
参加してくださった皆様のおかげでとても素晴らしい勉強会を開催することができたと思います。

■ 資料

C# 2.0 以降の新機能まとめ(名前とリンク)
C# 2.0 以降の新機能まとめ(概要とコード)
サンプルコード

■ 今後の C#/.NET 勉強会

C#/.NET に関する勉強会は今後も積極的に開催して行く予定です。気になる会があったら是非遊びに来てみてください。
今後とも C# をよろしくお願いいたします。

城東.NET #27 勉強会を開催しました。

■ 城東.NET

城東.NET #27 を開催しました。

城東.NET は東京の最近は秋葉原で毎月第3水曜日に開催している .NET 系の勉強会です。
発表を中心として、発表でなくとも最近やった事や新しい情報などを参加者で共有している会です。

今月は、5名の方にご参加いただきました。

発表は

  • .NET Core でデスクトップアプリ
  • VS Live Share

私は .NET Core でデスクトップアプリ Visual Studio 2019 Preview 版 というタイトルで話をしました。

その他 VS Live Share でモブプログラミングっぽいことをして遊んでいました。
これは良いものですね。実践で取り入れたいです。

■ 次回予定

来月は 01月16日(水)に開催の予定です。

.NET に関心のある方、是非遊びに来てください。

.NET Core 3.0 デスクトップアプリプロジェクトがビルドできない

.NET Core 3.0 のデスクトップアプリが次のコンパイルエラーでビルドできなくなることがあります。

重大度レベル コード 説明 プロジェクト ファイル 行 Suppression State
エラー MC1003 Project file cannot specify more than one ApplicationDefinition element. XXXXXX X:\XXXXXX\dotnet\sdk\3.0.100-preview-009812\Sdks\Microsoft.NET.Sdk.WindowsDesktop\targets\Microsoft.WinFX.targets

重大度レベル コード 説明 プロジェクト ファイル 行 Suppression State
エラー BG1003 The project file contains a property value that is not valid. XXXXXX X:\XXXXXX\dotnet\sdk\3.0.100-preview-009812\Sdks\Microsoft.NET.Sdk.WindowsDesktop\targets\Microsoft.WinFX.targets

■ 原因

今回エラーとなった原因は、最新の Preview 版で .csproj のフォーマットが変更されたことでした。 以前の alpha バージョンの .NET Core 3.0 で作成した .csproj と 現時点の最新の Preview バージョンの .csproj のフォーマットの例を挙げてみます。

alpha 版の例

<Project Sdk="Microsoft.NET.Sdk.Wpf">

  <PropertyGroup>
    <OutputType>WinExe</OutputType>
    <TargetFramework>netcoreapp3.0</TargetFramework>
  </PropertyGroup>

  <ItemGroup>
    <ApplicationDefinition Include="App.xaml" />
    <Page Include="MainWindow.xaml" />
  </ItemGroup>

  <ItemGroup>
    <FrameworkReference Include="Microsoft.DesktopUI" />
  </ItemGroup>

</Project>

最新の Preview 版の例

<Project Sdk="Microsoft.NET.Sdk.WindowsDesktop">

  <PropertyGroup>
    <OutputType>WinExe</OutputType>
    <TargetFramework>netcoreapp3.0</TargetFramework>
    <UseWPF>true</UseWPF>
  </PropertyGroup>

</Project>

古い形式の .csproj ではそもそも Visual Studio でプロジェクトを開くことができません。Project Sdk= 属性と <UseWPF>true</UseWPF> などを変更・追加し、新し形式に合わせることで Visual Studio で開けるようになります。
つまり

  <ItemGroup>
    <ApplicationDefinition Include="App.xaml" />
    <Page Include="MainWindow.xaml" />
  </ItemGroup>

の記述があっても、プロジェクトは開きます。しかし上記のエラー発生します。

■ 対策

.csproj の新しい形式に合わせて

  <ItemGroup>
    <ApplicationDefinition Include="App.xaml" />
    <Page Include="MainWindow.xaml" />
  </ItemGroup>

の記述も削除し、新しいフォーマットの .csproj に書き換えることで解決し、ビルド。実行できるようになりました。

.NET Core 3.0 デスクトップアプリプロジェクトが Visual Studio 2019 で開けない

.NET Core 3.0 のデスクトップアプリが Visual Studio で開けなくなることがあります。

■ 原因

今回開けなくなった原因は、最新の Preview 版で .csproj のフォーマットが変更されたことでした。 以前の alpha バージョンの .NET Core 3.0 で作成した .csproj と 現時点の最新の Preview バージョンの .csproj のフォーマットの例を挙げてみます。

alpha 版の例

<Project Sdk="Microsoft.NET.Sdk.Wpf">

  <PropertyGroup>
    <OutputType>WinExe</OutputType>
    <TargetFramework>netcoreapp3.0</TargetFramework>
  </PropertyGroup>

  <ItemGroup>
    <ApplicationDefinition Include="App.xaml" />
    <Page Include="MainWindow.xaml" />
  </ItemGroup>

  <ItemGroup>
    <FrameworkReference Include="Microsoft.DesktopUI" />
  </ItemGroup>

</Project>

最新の Preview 版の例

<Project Sdk="Microsoft.NET.Sdk.WindowsDesktop">

  <PropertyGroup>
    <OutputType>WinExe</OutputType>
    <TargetFramework>netcoreapp3.0</TargetFramework>
    <UseWPF>true</UseWPF>
  </PropertyGroup>

</Project>

■ 対策

新しいフォーマットの .csproj に書き換えることで解決し、Visual Studio で開けるようになりました。