rksoftware

Visual Studio とか C# とかが好きです

秋葉原 C# もくもく会 #40 勉強会を開催しました

■ C# もくもく会

C# もくもく会 #40 を開催しました。

C# もくもく会 は東京の秋葉原で毎週木曜日に開催している .NET 系の勉強会です。
もくもく自習を基本とし、分からないことを教えあったり情報共有したりしている会です。 定期開催していますので、お時間のある時に遊びに来ていただければと思います。
ちょっと詰まった時、ネット上で聞くのははずかしいなぁ、という課題のできた時などにも思い出していただけると嬉しいです。

f:id:rksoftware:20180601014950j:plain

C# もくもく会は入門者の方も多くご参加いただいています。プロジェクトの新規作成・.cs ファイルの新規作成からのチャレンジも応援させていただいています。
怖くない勉強会ですので、本当に C# これから、なんならプログラミングこれからという方も是非遊びに来てください。

C# をこれから始めるという方や、はじめたばかりの方、ステップアップを考えている方、C# と様々なかかわり方の方が集まっています。
特に C# で課題をお持ちでなくても是非遊びに来てください。

■ 目指す勉強会スタイル

世界一敷居の低い勉強会を目指しています。
何か聞きたいことがある場合は、聞く相手を決めずに独り言のようにつぶやくと誰かが拾ってくれる、そんなスタイルでやっています。

■ 次回予定

次回は 2018/06/07 に開催予定です。

C# に関心のある方、是非遊びに来てください。

複数プロジェクトを同時にデバッグする

Visual Studio では Visual Studio のひとつのインスタンス毎にソリューションを扱います。
ひとつのソリューションの中には複数のプロジェクトを作ることができます。
複数の実行可能なプロジェクトを持つこともできます。

■ プロジェクトのデバッグ

多くの場合、ソリューション(プロジェクト)の新規作成では、一つのソリューションに一つのプロジェクトの構成になります。
Xamarin の場合は、共有コードプロジェクトと各プラットフォームのプロジェクトでデフォルトだと4プロジェクトですね。
そういったプロジェクト構成では、F5 キーなどにより「スタートアッププロジェクト」に設定されているプロジェクト一つを実行できます。

■ クライアントアプリと、サーバーAPI

最近のアプリ開発では、クライアントアプリとサーバーAPIと、ふたつの実行可能なプロジェクトがあることが多いのではないでしょうか?
またこの構成の場合、両方を同時に実行しなければデバッグできません。

そんな時は次の解決方法があります。

■ マルチスタートアッププロジェクト

ソリューションエクスプローラーで

ソリューションを右クリック > スタートアップ プロジェクトの設定
f:id:rksoftware:20180530025106j:plain
マルチスタートアッププロジェクトで実行したいプロジェクト複数を「開始」に設定
f:id:rksoftware:20180530025123j:plain
これで、プロジェクトを複数同時に実行できるようになります。

秋葉原 C# もくもく会 #39 勉強会を開催しました

■ C# もくもく会

C# もくもく会 #39 を開催しました。

C# もくもく会 は東京の秋葉原で毎週木曜日に開催している .NET 系の勉強会です。
もくもく自習を基本とし、分からないことを教えあったり情報共有したりしている会です。 定期開催していますので、お時間のある時に遊びに来ていただければと思います。
ちょっと詰まった時、ネット上で聞くのははずかしいなぁ、という課題のできた時などにも思い出していただけると嬉しいです。

f:id:rksoftware:20180526140613j:plain
最近もくもくのお供お菓子がパクチーが多いですが、パクチー以外も用意しています。
パクチー苦手な方も是非遊びに来てください。

C# をこれから始めるという方や、はじめたばかりの方、ステップアップを考えている方、C# と様々なかかわり方の方が集まっています。
特に C# で課題をお持ちでなくても是非遊びに来てください。

■ 目指す勉強会スタイル

世界一敷居の低い勉強会を目指しています。
何か聞きたいことがある場合は、聞く相手を決めずに独り言のようにつぶやくと誰かが拾ってくれる、そんなスタイルでやっています。

■ 次回予定

次回は 2018/05/31 に開催予定です。

C# に関心のある方、是非遊びに来てください。

Visual Studio の 15.7.2 がリリースされました

15.7 が出て間もないですが、Visual Studio の 15.7.2 がリリースされました。
2 回目のマイナーアップデートです。いい感じですね。

相変わらず日本語ページは遅いので、最新のリリースは英語版を参照するのがおすすめです。

■ 更新内容

今回は更新内容は多めです。

  • アップグレード中に Anaconda のアンインストールに失敗する問題 (Error 87).
  • SQL Server Data Tools 15.6.0 インストーラー が "The configuration registry key could not be opened (0x800703F3)" で失敗する問題
  • エディターで JavaScript を編集する際のパフォーマンスの問題
  • コードカバレッジ機能が async メソッドを見ない問題
  • arm/arm64 フォルダーに atls.lib がない問題
  • テストエクスプローラーで以前に実行されたテストがグレーアウトされない
  • Web Forms プロジェクトのデバッグで、スクリプトのデバッグの有効設定およびブラウザのクローズでデバッグを終了する設定が正しく適用されない問題
  • Folly を使用しているとコンパイルエラーになる
  • Chrome ブラウザで ASP.NET のデバッグが行えない
  • Python でリファクターの名前の変更が機能しない
  • ディスクの空き容量が少ない場合に Visual Studio インストーラーが正しく動作しない
  • template argument deduction の問題
  • C++ constexpr string_view == がコンパイルに失敗する
  • ネイティブリソース (FSharp.Data.TypeProviders など) を使用する際の型プロバイダーの regression
  • F# の ASP.NET Core プロジェクトで UI でのファイル追加に失敗する問題
  • Service Fabric Tools で VS diagnostic events window がエラーメッセージとともに切断される問題

が解消されました。
現在私が触っているプロジェクトで関係するものがないのですが、素早いアップデートをしたいと思います。

■ 更新方法

Visual Studio の更新はメニューの ツール > ツールと機能を取得 で開くインストーラーから行えます。

Xamarin.Forms でオリジナルタイマーアプリを作ろう(もくじ)

オリジナルタイマーアプリを作ろうハンズオン

シンプルなタイマーアプリを作ることで Xamarin.Forms によるアプリ作成を体験します。

とりあえず最初に動くサンプルを手にしたい、なぞって書いてみたい、という希望に対していくらかの助けになればと思います。

ボリューム

アプリとして動くサンプルでかつ一通り動きのあるもの、そして一般的なアーキテクチャを実現する最低限必要な要素と盛りだくさんです。
とはいえ、コードそのものは短いので早い方なら、2~3時間で終わるかもしれません。そんな分量です。

しかし、記事の分量はそうはいきませんでした。技術要素の説明などがあるため2ページになってしまっています。
この記事はその2ページ分の目次です。

手順

01.プロジェクトの新規作成
02.横画面表示固定の設定
03.背景画像の表示
04.コントロールの説明
05.メインページの作成
06.ViewModelの作成
07.データバインディング
08.メッセージング
09.画面遷移
> 01.~09.

10.タイマーページの作成
11.タイマー処理
12.DependencyService
13.画面スリープしないようにする
14.TextToSpeech
15.AudioPlayer
16.オリジナルタイマーアプリにしてみよう
> 10.~16.

皆様の Xamarin.Forms 学習に少しでもお役に立てたらうれしいです。

Xamarin.Forms でオリジナルタイマーアプリを作ろう(2)

この記事は からの続きです。

10.タイマーページの作成

画面遷移後の画面を作成します。
これまで作ってきた MainPage と同様に、xaml、xaml.cs による View および ViewModel クラスを作成します。

View の作成

CountDownPage ビュークラスを作成します。

MyTimer プロジェクト(共有コードプロジェクト)に TimerSettings クラスを作成します。
クラスの作成方法は [背景画像の表示] で学んでいます。今回は少し違う部分がありますが、基本的な流れは同じです。思い出しながら作成してください。

Mac の場合
・ソリューションエクスプローラー上の [MyTimer] 上で二本指タップ (右クリック) します。
・[追加 > 新しいファイル] を選択します。
・[新しいファイル] ウィンドウで [Forms > フォーム ContentPage Xaml] を選択します。
・[名前:] に CountDownPage と入力します
・[新規] をクリックします。

Windows の場合
・ソリューションエクスプローラー上の [MyTimer] 上で二本指タップ (右クリック) します。
・[追加 > 新しい項目] を選択します。
・[新しい項目の追加 - MyTimer] ウィンドウの左のペインで [インストール済み > Visual C# アイテム > Xamarin.Forms] を選択します。
・右のペインで [ContentPage] を選択します。
・[名前:] に CountDownPage と入力します。
・[追加] をクリックします。

ViewModel の作成

MyTimer プロジェクト (共有コードプロジェクト) に CountDownPageViewModel クラスを作成します。
クラスの作成方法は [背景画像の表示] で学んでいます。思い出しながら作成してください。

現在のカウントのデータバインディング

カウント画面の現在のカウント (カウントダウン表示) をデータバインディングします。
カウント中の残り時間は ViewModel のプロパティとして保持します。表示は View になります。
データバインディングについては [データバインディング] で学んでいます。思い出しながら次のコードで View、ViewModel それぞれを上書きしてください。

・CountDownPageViewModel.cs

using System;
using System.Collections.Generic;
using System.Linq;
using System.Text;
using Xamarin.Forms;

namespace MyTimer
{
    // タイマーカウント画面の ViewModel
    class CountDownPageViewModel : BindableBase
    {
        // カウントの残り時間
        private TimeSpan _time;
        public TimeSpan Time
        {
            get { return _time; }
            private set { SetProperty(ref _time, value); }
        }
    }
}

・CountDownPage.xaml

<?xml version="1.0" encoding="utf-8" ?>
<ContentPage xmlns="http://xamarin.com/schemas/2014/forms"
             xmlns:x="http://schemas.microsoft.com/winfx/2009/xaml"
             xmlns:local="clr-namespace:MyTimer"
             x:Class="MyTimer.CountDownPage"
             xmlns:vm="clr-namespace:MyTimer"
             Title="カウントダウン">
    <!-- ViewModel を設定、構築 -->
    <ContentPage.BindingContext>
        <vm:CountDownPageViewModel/>
    </ContentPage.BindingContext>
    <!-- ページの表示内容 -->
    <ContentPage.Content>
        <Grid>
            <!-- 背景画像 -->
            <Image Source="{local:ImageResource MyTimer.Resources.Background.png}" Aspect="AspectFit" />
            <!-- 文字が背景に埋もれないよう、背景画像に半透明色を乗せる -->
            <Grid BackgroundColor="#80FFFFFF"/>

            <!-- 残り時間の表示 -->
            <Label Text="{Binding Time, StringFormat='{0:mm\\:ss\\.fff}'}"
                HorizontalOptions="Center" VerticalOptions="Center"
                FontSize="96" TextColor="Black" FontAttributes="Bold"/>
            <!-- Back ボタン -->
            <Button Text=" &lt; Back "
                HorizontalOptions="Start" VerticalOptions="Start"
                BackgroundColor="#80808080"/>
        </Grid>
    </ContentPage.Content>
</ContentPage>

戻る遷移

カウント画面からタイマー設定画面 (メイン画面・最初の画面) に戻る処理は、タイマーをスタートした時と同様に、Viewに記述します。
ページを戻るには Navigation オブジェクトの Pop~ メソッドを呼び出します。Pop~ メソッドは複数ありますが、このページへの遷移をするときの Push~ と対になるものを使えば OK です。
今回は PushModalAsync メソッドで遷移したので PopModalAsync でを使用します。

// タイマー設定画面へ遷移する
this.Navigation.PopModalAsync();

また、View へ遷移した時と同様に戻る処理も View に記述します。そのため今回もメッセージングを使用します。メッセージングについては [メッセージング] で、 画面遷移については [画面遷移] で学んでいます。思い出しながら次のコードで View、ViewModel のコードを上書きしてください。

・CountDownPageViewModel.cs

using System;
using System.Collections.Generic;
using System.Linq;
using System.Text;
using Xamarin.Forms;

namespace MyTimer
{
    // タイマーカウント画面の ViewModel
    class CountDownPageViewModel : BindableBase
    {
        // カウントの残り時間
        private TimeSpan _time;
        public TimeSpan Time
        {
            get { return _time; }
            private set { SetProperty(ref _time, value); }
        }

        // 戻るボタンが押された
        public Command GoBackCommand { get; }

        // 画面を閉じ、カウント設定画面へ戻る
        private void GoBack()
        {
            // 画面を「戻る」メッセージを送信
            MessagingCenter.Send(this, "GoBack");
        }

        // コンストラクタ
        public CountDownPageViewModel()
        {
            // コマンドの設定
            // readonly プロパティの初期化は、コンストラクタ内でも行える
            GoBackCommand = new Command(GoBack);
        }
    }
}

・CountDownPage.cs

using System;
using System.Collections.Generic;
using System.Linq;
using System.Text;
using System.Threading.Tasks;

using Xamarin.Forms;
using Xamarin.Forms.Xaml;

namespace MyTimer
{
    // タイマーカウントダウン画面
    [XamlCompilation(XamlCompilationOptions.Compile)]
    public partial class CountDownPage : ContentPage
    {
        // コンストラクタ
        public CountDownPage ()
        {
            InitializeComponent ();
        }

        // 画面が表示されたタイミングでの処理
        private void CountDownPageAppearing(object sender, EventArgs e)
        {
            // 戻るメッセージを購読する
            MessagingCenter.Subscribe<CountDownPageViewModel>(this, "GoBack", GoBack);
        }

        // 画面が表示されなくなったタイミングでの処理
        private void CountDownPageDisappearing(object sender, EventArgs e)
        {
            // メッセージの購読を解除する
            MessagingCenter.Unsubscribe<CountDownPageViewModel>(this, "GoBack");
        }

        // 画面を閉じ、タイマー設定画面へ戻る
        private void GoBack<T>(T sender)
        {
            // タイマー設定画面へ遷移する
            this.Navigation.PopModalAsync();
        }
    }
}

・CountDownPage.xaml.cs

<?xml version="1.0" encoding="utf-8" ?>
<ContentPage xmlns="http://xamarin.com/schemas/2014/forms"
             xmlns:x="http://schemas.microsoft.com/winfx/2009/xaml"
             xmlns:local="clr-namespace:MyTimer"
             x:Class="MyTimer.CountDownPage"
             xmlns:vm="clr-namespace:MyTimer"
             Appearing="CountDownPageAppearing"
             Disappearing="CountDownPageDisappearing"
             Title="カウントダウン">
    <!-- ViewModel を設定、構築 -->
    <ContentPage.BindingContext>
        <vm:CountDownPageViewModel/>
    </ContentPage.BindingContext>
    <!-- ページの表示内容 -->
    <ContentPage.Content>
        <Grid>
            <!-- 背景画像 -->
            <Image Source="{local:ImageResource MyTimer.Resources.Background.png}" Aspect="AspectFit" />
            <!-- 文字が背景に埋もれないよう、背景画像に半透明色を乗せる -->
            <Grid BackgroundColor="#80FFFFFF"/>

            <!-- 残り時間の表示 -->
            <Label Text="{Binding Time, StringFormat='{0:mm\\:ss\\.fff}'}"
                HorizontalOptions="Center" VerticalOptions="Center"
                FontSize="96" TextColor="Black" FontAttributes="Bold"/>
            <!-- Back ボタン -->
            <Button Text=" &lt; Back " Command="{Binding GoBackCommand}"
                HorizontalOptions="Start" VerticalOptions="Start"
                BackgroundColor="#80808080"/>
        </Grid>
    </ContentPage.Content>
</ContentPage>

確認

デバッグ実行し、[タイマー開始] で二つ目の View に遷移し、[< Back] で一つ目の画面に戻れたらこのステップは完了です。

・一つ目の View
f:id:rksoftware:20180520125858j:plain

・二つ目のView
f:id:rksoftware:20180520125918j:plain

11.タイマー処理

このアプリのメイン機能である時間をカウントするためのタイマー処理を作成します。
Xamarin.Forms では Xamarin.Forms.Device クラスの StartTimer メソッドでタイマーを実装できます。

時間計測機能の作成

タイマーを定期的に実行すれば、その実行回数とタイマー間隔で経過時間がわかるという考えもあるかもしれません。あまり精度を必要としないアプリであれば、それで構いません。しかしタイマーの実行間隔の精度はそれほど高くありません。
正確に時間を計りたい場合は、System.Diagnostics.Stopwatch クラスが利用できます。
ただし、Stopwatch クラスにはタイマーのように定期的に何らかの処理を起動する機能はありませんので、これらのタイマーとストップウォッチを組み合わせて実装します。

タイマーの実行

CountDownPageViewModel クラスに Stopwatch オブジェクトをフィールドとして保持します。
次のコードを CountDownPageViewModel.cs に追加してください。

// タイマーカウント用のストップウォッチ
private System.Diagnostics.Stopwatch _stopwatch = new System.Diagnostics.Stopwatch();

ストップウォッチとタイマーを起動します。
次のコードを CountDownPageViewModel.cs のコンストラクタ public CountDownPageViewModel() に追加してください。

// ストップウォッチをスタート
_stopwatch.Start();
// カウントダウン更新タイマーをスタート
Xamarin.Forms.Device.StartTimer(TimeSpan.FromMilliseconds(33), OnTimerTick);

タイマー間隔ごとの処理

タイマーを使ったコードでは一定間隔ごとに設定したメソッドが呼ばれます。
一定間隔ごとに実行されるメソッドを作成します。
次のコードを CountDownPageViewModel.cs に追加してください。

// 画面表示を更新
// カウントダウン中の残り時間の画面表示を更新する
// タイマー処理のたびに呼び出される
private void UpdateTime()
{
    var time = Math.Max(0, (TimerSettings.Instance.CountMilliseconds - _stopwatch.ElapsedMilliseconds));
    Console.WriteLine(time);
    Time = TimeSpan.FromMilliseconds(time);
}

// タイマー処理
// 毎回のタイマーイベントの処理
private bool OnTimerTick()
{
    // 残り時間を更新
    UpdateTime();
    // 時間が残っている場合、タイマーを続行
    if (Time.TotalMilliseconds > 0)
        return true;

    // 時間が経過しきった場合、一回だけ動かすタイマーをスタートし本タイマーは終了する
    Xamarin.Forms.Device.StartTimer(TimeSpan.FromMilliseconds(100),OnTimerEnd);
    return false;
}

UpdateTime メソッド内で遷移前の View で設定したパラメータを参照していることも確認しておきましょう。

設定時間経過時の処理

カウントダウンが終了した後に最後に一度だけ実行する処理を作成します。
今回のアプリにはカウントダウン終了後に音声で通知する機能があります。音声を再生する処理は後の手順で作成しますので、ここでは空のメソッドだけ用意しておきます。
次のコードを CountDownPageViewModel.cs に追加してください。

// 時間が経過しきった後の、一度だけ動かすタイマーの処理
private bool OnTimerEnd()
{
    // タイマー設定を確認し
    // テキストの読み上げ、または音声ファイルの再生を行う
    if (TimerSettings.Instance.UseSpeechText)
        TextToSpeech();
    else
        PlayAudio();
    return false;
}

// テキストの読み上げ
private async void TextToSpeech()
{
}

// 音声ファイルの再生
private void PlayAudio()
{
}

ここまでの手順で CountDownPageViewModel.cs のコードは次のようになります。

using System;
using System.Collections.Generic;
using System.Linq;
using System.Text;
using Xamarin.Forms;

namespace MyTimer
{
    // タイマーカウント画面の ViewModel
    class CountDownPageViewModel : BindableBase
    {
        // タイマーカウント用のストップウォッチ
        private System.Diagnostics.Stopwatch _stopwatch = new System.Diagnostics.Stopwatch();

        // カウントの残り時間
        private TimeSpan _time;
        public TimeSpan Time
        {
            get { return _time; }
            private set { SetProperty(ref _time, value); }
        }

        // 戻るボタンが押された
        public Command GoBackCommand { get; }

        // 画面を閉じ、カウント設定画面へ戻る
        private void GoBack()
        {
            // 画面を「戻る」メッセージを送信
            MessagingCenter.Send(this, "GoBack");
        }

        // コンストラクタ
        public CountDownPageViewModel()
        {
            // コマンドの設定
            // readonly プロパティの初期化は、コンストラクタ内でも行える
            GoBackCommand = new Command(GoBack);

            // ストップウォッチをスタート
            _stopwatch.Start();
            // カウントダウン更新タイマーをスタート
            Xamarin.Forms.Device.StartTimer(TimeSpan.FromMilliseconds(33), OnTimerTick);
        }

        // 画面表示を更新
        // カウントダウン中の残り時間の画面表示を更新する
        // タイマー処理のたびに呼び出される
        private void UpdateTime()
        {
            var time = Math.Max(0, (TimerSettings.Instance.CountMilliseconds - _stopwatch.ElapsedMilliseconds));
            Console.WriteLine(time);
            Time = TimeSpan.FromMilliseconds(time);
        }

        // タイマー処理
        // 毎回のタイマーイベントの処理
        private bool OnTimerTick()
        {
            // 残り時間を更新
            UpdateTime();
            // 時間が残っている場合、タイマーを続行
            if (Time.TotalMilliseconds > 0)
                return true;

            // 時間が経過しきった場合、一回だけ動かすタイマーをスタートし本タイマーは終了する
            Xamarin.Forms.Device.StartTimer(TimeSpan.FromMilliseconds(100), OnTimerEnd);
            return false;
        }

        // 時間が経過しきった後の、一度だけ動かすタイマーの処理
        private bool OnTimerEnd()
        {
            // タイマー設定を確認し
            // テキストの読み上げ、または音声ファイルの再生を行う
            if (TimerSettings.Instance.UseSpeechText)
                TextToSpeech();
            else
                PlayAudio();
            return false;
        }

        // テキストの読み上げ
        private async void TextToSpeech()
        {
        }

        // 音声ファイルの再生
        private void PlayAudio()
        {
        }

    }
}

12.DependencyService

タイマーアプリの機能としてタイマー設定時間が経過したことを音で伝えます。
音声ファイルの再生などのプラットフォームごとの機能は、Xamarin.Forms では機能が用意されていません (Xamarin.Android や Xamarin.iOS では対応しています) 。
このような機能は DependencyService を使うことで簡単に実装できます。

DependencyService 概要

プロジェクト構成上、プラットフォーム機能は MyTimer.Android や MyTimer.iOS といったプラットフォーム毎のプロジェクトに作成します。そしてそれら作成した処理は、MyTimer プロジェクトといった共有コードのプロジェクトから呼び出して起動します。
しかしプロジェクト間の依存の方向として、共有コードプロジェクトからプラットフォームのプロジェクトを参照することはできません。この制約を越えるための手段の一つが DependencyService です。

共有コードプロジェクト上の実装

共有コードプロジェクト (MyTimer プロジェクト) にインターフェイスを作成します。今回は DependencyService を使って画面の自動スリープを止める機能を作成するので、それを前提とした名前で作成して行きます。

インターフェイスの作成方法はクラスや View の作成と基本的に同じ流れになります。思い出しながら作成してください。

Mac の場合
・ソリューションエクスプローラー上の [MyTimer] 上で二本指タップ (右クリック) します。
・[追加 > 新しいファイル] を選択します。
・[新しいファイル] ウィンドウで [General > 空のインターフェイス] を選択します。
・[名前:] に IKeepScreenOn と入力します。
・[新規] をクリックします。

Windows の場合
・ソリューションエクスプローラー上の [MyTimer] 上で二本指タップ(右クリック)します。
・[追加 > 新しい項目] を選択します。
・[新しい項目の追加 - MyTimer] ウィンドウの左のペインで [インストール済み > Visual C# アイテム > コード] を選択します。
・右のペインで [インターフェイス] を選択します。
・[名前:] に IKeepScreenOn と入力します。
・[追加] をクリックします。

共通
機能を呼び出すメソッドを定義します。今回は画面スリープを止める機能の ON/OFF を設定する Set メソッドを定義します。
次のコードで IKeepScreenOn.cs を上書きしてください。

using System;
using System.Collections.Generic;
using System.Text;

namespace MyTimer
{
    // / KeepScreenOn の DependencyService 用のインターフェイス
    public interface IKeepScreenOn
    {
        // KeepScreenOn を設定
        void Set(bool keepOn);
    }
}

Android プロジェクト上の実装

Android プロジェクト (MyTimer.Android または MyTimer.Droid) に実装クラスを作成します。
※注意※ これまでの MyTimer プロジェクトではない点に注意してください
クラスの作成方法は [背景画像の表示] で学んでいます。思い出しながら作成してください。
※最初の二本指タップ(右クリック)が、ソリューションエクスプローラー上の [MyTimer.Android] または [MyTimer.Droid] になる点に注意してください

  • KeppScreenOn クラス

作成した KeppScreenOnIKeepScreenOn を実装します。
次のコードを KeppScreenOn.cs ファイルのクラス名の宣言を次のように書き換えます。

// KeepScreenOn の Android の実装
class KeppScreenOn : IKeepScreenOn

インターフェイスで定義されたメソッドも実装します。ここではまだ機能は作成しないので空の実装です。
次のコードを KeppScreenOn クラスに追加します。

// KeepScreenOn を設定
public void Set(bool keepOn){ ; }

DependencyService の実装クラスは assembly
KeppScreenOn.cs ファイルの namespace 指定の前に追加します。

// Dependency Service に Android の実装を登録
[assembly: Xamarin.Forms.Dependency(typeof(MyTimer.Droid.KeppScreenOn))]

ここまでの KeppScreenOn.cs のコードは次のようになります。

using System;
using System.Collections.Generic;
using System.Linq;
using System.Text;

using Android.App;
using Android.Content;
using Android.OS;
using Android.Runtime;
using Android.Views;
using Android.Widget;

// Dependency Service に Android の実装を登録
[assembly: Xamarin.Forms.Dependency(typeof(MyTimer.Droid.KeppScreenOn))]
namespace MyTimer.Droid
{
    // KeepScreenOn の Android の実装
    class KeppScreenOn : IKeepScreenOn
    {
        // KeepScreenOn を設定
        public void Set(bool keepOn){ ; }
    }
}

iOS プロジェクト上の実装

iOS プロジェクト (MyTimer.iOS) に実装クラスを作成します。
※注意※ これまでの MyTimer プロジェクトではない点に注意してください
クラスの作成方法は [背景画像の表示] で学んでいます。思い出しながら作成してください。
※最初の二本指タップ(右クリック)が、ソリューションエクスプローラー上の [MyTimer.iOS] になる点に注意してください

  • KeppScreenOn クラス

作成した KeppScreenOnIKeepScreenOn を実装します。次のコードを KeppScreenOn.cs ファイルのクラス名の宣言を次のように書き換えます。

// KeepScreenOn の iOS の実装
class KeppScreenOn : IKeepScreenOn

インターフェイスで定義されたメソッドも実装します。ここではまだ機能は作成しないので空の実装です。
次のコードを KeppScreenOn クラスに追加します。

// KeepScreenOn を設定
public void Set(bool keepOn){ ; }

DependencyService の実装クラスは assembly 属性の設定も必要です。
次のコードを KeppScreenOn.cs ファイルの namespace 指定の前に追加します。

// Dependency Service に iOS の実装を登録
[assembly: Xamarin.Forms.Dependency(typeof(MyTimer.iOS.KeppScreenOn))]

ここまで手順で KeppScreenOn.cs は次のようになります。

using System;
using System.Collections.Generic;
using System.Linq;
using System.Text;

using Foundation;
using UIKit;

// Dependency Service に iOS の実装を登録
[assembly: Xamarin.Forms.Dependency(typeof(MyTimer.iOS.KeppScreenOn))]
namespace MyTimer.iOS
{
    // KeepScreenOn の iOS の実装
    class KeppScreenOn : IKeepScreenOn
    {
        // KeepScreenOn を設定
        public void Set(bool keepOn){ ; }
    }
}

機能の実行

共有コードプロジェクト (MyTimer プロジェクト) からプラットフォームのプロジェクトの KeppScreenOn クラスを呼び出します。
Xamarin.Forms.DependencyService クラスの Get<T>() メソッドで先ほど作成したクラスを呼び出せます。

共有コードプロジェクト (MyTimer プロジェクト) の CountDownPageViewModel クラスのコンストラクターに次のコードを追加します。

// 画面をスリープしない設定
DependencyService.Get<IKeepScreenOn>().Set(true);

CountDownPageViewModel クラスのコンストラクターは次のようになります。

// コンストラクタ
public CountDownPageViewModel()
{
    // コマンドの設定
    // readonly プロパティの初期化は、コンストラクタ内でも行える
    GoBackCommand = new Command(GoBack);

    // ストップウォッチをスタート
    _stopwatch.Start();
    // カウントダウン更新タイマーをスタート
    Xamarin.Forms.Device.StartTimer(TimeSpan.FromMilliseconds(33), OnTimerTick);

    // 画面をスリープしない設定
    DependencyService.Get<IKeepScreenOn>().Set(true);
}

13.画面スリープしないようにする

スマートデバイスには触らないでいると自動で画面 OFF になる機能があり、一般的に端末の所有者はこの設定を行っています。
しかし、今回作成しているアプリはタイマーアプリです。この画面が自動で OFF になってはあまり使い勝手の良いものではありません。

DependencyService

アプリ起動中に画面が自動で OFF にならないようにするにはプラットフォーム毎の個別の実装が必要です。ここで、前ページの DependencyService が利用できます。

共通コードプロジェクト上の実装

前ページの手順で既に完了しています。

Android プロジェクト上の実装

Android で画面スリープを OFF にするのは少し厄介です。理由は設定に Activity の参照が必要となっているためです。Android の過去のバージョンでは Activity を取得する static メソッドが用意されていましたが現在は非推奨となっています (Xamarin ではなく Android の SDK です) 。
今回は起動時に Activity の参照を記録する方針で作成します。

Android プロジェクト (MyTimer.Android または MyTimer.Droid) の KeppScreenOn クラスに Activity を保存するフィールドとメソッドを作成します。
※注意※ iOS プロジェクトにも同名のクラスがあります。間違えないよう注意してください

次のコードを KeppScreenOn クラスに追加してください。

// Activity を static フィールドに確保
private static Activity _mainActivity;
public static void SetActivity(Activity activity) => _mainActivity = activity;

以前の手順で空実装にしておいた Set メソッドを実装します。
次のコードで KeppScreenOn クラスの Set メソッドを上書きしてください。

// KeepScreenOn を設定
public void Set(bool keepOn) => _mainActivity.RunOnUiThread(() =>
{
    if (keepOn)
        _mainActivity.Window.AddFlags(WindowManagerFlags.KeepScreenOn);
    else
        _mainActivity.Window.ClearFlags(WindowManagerFlags.KeepScreenOn);
});

KeppScreenOn.cs は次のようになります。

using System;
using System.Collections.Generic;
using System.Linq;
using System.Text;

using Android.App;
using Android.Content;
using Android.OS;
using Android.Runtime;
using Android.Views;
using Android.Widget;

// Dependency Service に Android の実装を登録
[assembly: Xamarin.Forms.Dependency(typeof(MyTimer.Droid.KeppScreenOn))]
namespace MyTimer.Droid
{
    // KeepScreenOn の Android の実装
    class KeppScreenOn : IKeepScreenOn
    {
        // Activity を static フィールドに確保
        private static Activity _mainActivity;
        public static void SetActivity(Activity activity) => _mainActivity = activity;

        // KeepScreenOn を設定
        public void Set(bool keepOn) => _mainActivity.RunOnUiThread(() =>
        {
            if (keepOn)
                _mainActivity.Window.AddFlags(WindowManagerFlags.KeepScreenOn);
            else
                _mainActivity.Window.ClearFlags(WindowManagerFlags.KeepScreenOn);
        });
    }
}

Android プロジェクトでは MainActivity クラスへもコード追加が必要になります。
Android プロジェクトの MainActivity.cs 内の MainActivity クラスの OnCreate メソッドに次のコードを追加します。追加する位置は global::Xamarin.Forms.Forms.Init(this, bundle); の次の行です。

KeppScreenOn.SetActivity(this);

MainActivity.cs は次のようになります。

using System;

using Android.App;
using Android.Content.PM;
using Android.Runtime;
using Android.Views;
using Android.Widget;
using Android.OS;

namespace MyTimer.Droid
{
    [Activity(Label = "MyTimer", Icon = "@drawable/icon", Theme = "@style/MainTheme", MainLauncher = true, ConfigurationChanges = ConfigChanges.ScreenSize | ConfigChanges.Orientation, ScreenOrientation = ScreenOrientation.Landscape)]
    public class MainActivity : global::Xamarin.Forms.Platform.Android.FormsAppCompatActivity
    {
        protected override void OnCreate(Bundle bundle)
        {
            TabLayoutResource = Resource.Layout.Tabbar;
            ToolbarResource = Resource.Layout.Toolbar;

            base.OnCreate(bundle);

            global::Xamarin.Forms.Forms.Init(this, bundle);
            KeppScreenOn.SetActivity(this);
            LoadApplication(new App());
        }
    }
}

iOS プロジェクト上の実装

iOS は Android と比べて手順が少なくて済みます。

以前の手順で空実装にしておいた Set メソッドを実装します。
次のコードで KeppScreenOn クラスの Set メソッドを上書きしてください。
※注意※ Android プロジェクトにも同名のクラスがあります。間違えないよう注意してください

// KeepScreenOn を設定
public void Set(bool keepOn) => UIApplication.SharedApplication.InvokeOnMainThread(() =>
                UIApplication.SharedApplication.IdleTimerDisabled = keepOn);

KeppScreenOn.cs は次のようになります。

using System;
using System.Collections.Generic;
using System.Linq;
using System.Text;

using Foundation;
using UIKit;

// Dependency Service に iOS の実装を登録
[assembly: Xamarin.Forms.Dependency(typeof(MyTimer.iOS.KeppScreenOn))]
namespace MyTimer.iOS
{
    // KeepScreenOn の iOS の実装
    class KeppScreenOn : IKeepScreenOn
    {
        // KeepScreenOn を設定
        public void Set(bool keepOn) => UIApplication.SharedApplication.InvokeOnMainThread(() =>
                        UIApplication.SharedApplication.IdleTimerDisabled = keepOn);
    }
}

14.TextToSpeech

タイマー設定時間の経過を音声で知らせる機能を実装します。
スマートデバイスに設定したテキストをしゃべらせる機能は、プラットフォーム毎の機能になり Xamrin.Forms の機能にはありません。前述の DependencyService を利用することで自身で実装することもできますが、今回は NuGet からライブラリを取得し利用します。

NuGet の概要

パッケージ管理のサービスです。
世界中の開発者が多くのライブラリを登録してくれています。今回のテキストをしゃべる機能のように、良く使いそうな機能の多くは NuGet 上でライブラリが見つかります。
今回利用する TextToSpeech もその一つです。作者に感謝しながらプロジェクトに追加しましょう。

TextToSpeech の追加 (Mac の場合)

・ソリューションエクスプローラー上の [MyTimer] プロジェクト上で二本指タップ (右クリック) します。
・[追加 > NuGet パッケージの追加] を選択します。
f:id:rksoftware:20180520120050j:plain

・検索ボックスに xam.plugins.texttospeech と入力します。
・検索結果欄で Xam.Plugins.TextToSpeech を選択します。
・[パッケージを追加] ボタンをクリックします。
f:id:rksoftware:20180520120108j:plain

・[ライセンスの同意] ダイアログで [同意する] をクリックします。

同様の手順で、[MyTimer.Droid]、[MyTimer.iOS] プロジェクトにもパッケージを追加します。

TextToSpeech の追加 (Windows の場合)

・ソリューションエクスプローラー上の [MyTimer] 上で二本指タップ (右クリック) します。
※プロジェクトではなくソリューションを二本指タップ (右クリック) することに注意してください
・[ソリューションの NuGet パッケージの管理] を選択します。
f:id:rksoftware:20180520120132j:plain

・[参照] タブを選択します。
・検索ボックスに xam.plugins.texttospeech と入力します。
・検索結果欄で Xam.Plugins.TextToSpeech を選択します。
・右ペインのチェックボックスを全て ([MyTimer] [MyTimer\MyTimer.Android~] [MyTimer\MyTimer.iOS~]) ON にします。
・[インストール] ボタンをクリックします。
f:id:rksoftware:20180520120152j:plain

・[変更のプレビュー] ダイアログで [OK] ボタンをクリックします。

TextToSpeech の利用

TextToSpeech を利用するには、Plugin.TextToSpeech.CrossTextToSpeech クラスの static プロパティ Current で取得できるオブジェクトの Speak メソッドを実行するだけです。しゃべるテキストはメソッドの引数で指定します。
今回のしゃべるテキストは、全画面から渡されたパラメーターの中に含まれています。

CountDownPageViewModel クラスの TextToSpeech メソッドを次のコードで上書きしてください。

// テキストの読み上げ
private async void TextToSpeech()
{
    await Plugin.TextToSpeech.CrossTextToSpeech.Current.Speak(TimerSettings.Instance.SpeechText, volume:0.5f);
}

15.AudioPlayer

タイマー設定時間の経過を音声で知らせる機能を実装します。
音声ファイルを再生する機能は、プラットフォーム毎の機能になり Xaamrin.Forms の機能にはありません。前述の DependencyService を利用することで自身で実装することもできますが、今回は TextToSpeech と同様に NuGet からライブラリを取得し利用します。

AudioPlayer の追加

NuGet パッケージの追加は [TextToSpeech] で学んでいます。思い出しながら Xam.Plugin.SimpleAudioPlayer を追加してください。

AudioPlayer の利用

AudioPlayer を利用するには、Plugin.SimpleAudioPlayer.CrossSimpleAudioPlayer クラスの static プロパティ Current で取得できるオブジェクトの Load メソッドと Play メソッドをメソッドを実行するだけです。再生する音声データはLoadメソッドの引数で設定します。
今回再生する音声ファイルは [背景画像の表示] の手順ですでに追加しています。

CountDownPageViewModel クラスの PlayAudio メソッドを次のコードで上書きしてください。

// 音声ファイルの再生
private void PlayAudio()
{
    try
    {
        var player = Plugin.SimpleAudioPlayer.CrossSimpleAudioPlayer.Current;
        var assembly = typeof(App).Assembly;
        var name = "MyTimer.Resources.voice.m4a";
        // name 確認
        if (!IsContainsResource(assembly, name)) return;
        using (var stream = assembly.GetManifestResourceStream(name))
            player.Load(stream);
        player.Play();
    }
    catch (Exception ex)
    {
        Console.WriteLine(ex.Message);
        throw;
    }
}

※ファイル名の指定などでミスをしやすいためエラーハンドリングなどを行っているためコードが長くなっています。コードは後日お時間のある時にゆっくり確認してみてください

音声ファイル名の指定は特に間違えやすくエラーもわかりにくいため専用のチェックメソッドを作成します。
次のコードを CountDownPageViewModel クラスに追加してください。

// 音声ファイルのリソース名指定に誤りがないかチェックをする
private bool IsContainsResource(System.Reflection.Assembly assembly, string name)
{
    if (assembly.GetManifestResourceNames().Contains(name)) return true;
    Console.WriteLine($"name : {name} はリソースに存在しません。");
    Console.WriteLine("リソースに含まれるファイル:");
    foreach (var resoureName in assembly.GetManifestResourceNames())
        Console.WriteLine(resoureName);
    return false;
}

ここまでの手順で CountDownPageViewModel.cs は次のようになっています。

using System;
using System.Collections.Generic;
using System.Linq;
using System.Text;
using Xamarin.Forms;

namespace MyTimer
{
    // タイマーカウント画面の ViewModel
    class CountDownPageViewModel : BindableBase
    {
        // タイマーカウント用のストップウォッチ
        private System.Diagnostics.Stopwatch _stopwatch = new System.Diagnostics.Stopwatch();

        // カウントの残り時間
        private TimeSpan _time;
        public TimeSpan Time
        {
            get { return _time; }
            private set { SetProperty(ref _time, value); }
        }

        // 戻るボタンが押された
        public Command GoBackCommand { get; }

        // 画面を閉じ、カウント設定画面へ戻る
        private void GoBack()
        {
            // 画面を「戻る」メッセージを送信
            MessagingCenter.Send(this, "GoBack");
        }

        // コンストラクタ
        public CountDownPageViewModel()
        {
            // コマンドの設定
            // readonly プロパティの初期化は、コンストラクタ内でも行える
            GoBackCommand = new Command(GoBack);

            // ストップウォッチをスタート
            _stopwatch.Start();
            // カウントダウン更新タイマーをスタート
            Xamarin.Forms.Device.StartTimer(TimeSpan.FromMilliseconds(33), OnTimerTick);

            // 画面をスリープしない設定
            DependencyService.Get<IKeepScreenOn>().Set(true);
        }

        // 画面表示を更新
        // カウントダウン中の残り時間の画面表示を更新する
        // タイマー処理のたびに呼び出される
        private void UpdateTime()
        {
            var time = Math.Max(0, (TimerSettings.Instance.CountMilliseconds - _stopwatch.ElapsedMilliseconds));
            Console.WriteLine(time);
            Time = TimeSpan.FromMilliseconds(time);
        }

        // タイマー処理
        // 毎回のタイマーイベントの処理
        private bool OnTimerTick()
        {
            // 残り時間を更新
            UpdateTime();
            // 時間が残っている場合、タイマーを続行
            if (Time.TotalMilliseconds > 0)
                return true;

            // 時間が経過しきった場合、一回だけ動かすタイマーをスタートし本タイマーは終了する
            Xamarin.Forms.Device.StartTimer(TimeSpan.FromMilliseconds(100), OnTimerEnd);
            return false;
        }

        // 時間が経過しきった後の、一度だけ動かすタイマーの処理
        private bool OnTimerEnd()
        {
            // タイマー設定を確認し
            // テキストの読み上げ、または音声ファイルの再生を行う
            if (TimerSettings.Instance.UseSpeechText)
                TextToSpeech();
            else
                PlayAudio();
            return false;
        }

        // テキストの読み上げ
        private async void TextToSpeech()
        {
            await Plugin.TextToSpeech.CrossTextToSpeech.Current.Speak(TimerSettings.Instance.SpeechText, volume: 0.5f);
        }

        // 音声ファイルの再生
        private void PlayAudio()
        {
            try
            {
                var player = Plugin.SimpleAudioPlayer.CrossSimpleAudioPlayer.Current;
                var assembly = typeof(App).Assembly;
                var name = "MyTimer.Resources.voice.m4a";
                // name 確認
                if (!IsContainsResource(assembly, name)) return;
                using (var stream = assembly.GetManifestResourceStream(name))
                    player.Load(stream);
                player.Play();
            }
            catch (Exception ex)
            {
                Console.WriteLine(ex.Message);
                throw;
            }
        }

        // 音声ファイルのリソース名指定に誤りがないかチェックをする
        private bool IsContainsResource(System.Reflection.Assembly assembly, string name)
        {
            if (assembly.GetManifestResourceNames().Contains(name)) return true;
            Console.WriteLine($"name : {name} はリソースに存在しません。");
            Console.WriteLine("リソースに含まれるファイル:");
            foreach (var resoureName in assembly.GetManifestResourceNames())
                Console.WriteLine(resoureName);
            return false;
        }

    }
}

実行 - 完成

これでアプリは完成です。
実行してタイマーアプリとして動作することを確認しましょう!

16.オリジナルタイマーアプリにしてみよう

これでタイマーアプリは完成です。まずは少し動かして自分の手でアプリを作った感動を味わいましょう!

独自カスタマイズ

ひとまず動かしてみたら今度は独自のカスタマイズを加えてオリジナルアプリにしてみましょう!

カスタマイズポイント

次のカスタマイズポイントは簡単にカスタマイズでき高い自分のアプリ感を味わえるポイントです。

  • 背景画像を変更してみよう!
  • 再生する音声を変更してみよう!

時間があれば

自分の使い方に合わせてカスタマイズをしてみましょう。

  • 良く計る時間のある方は、例えば 3 分・4 分・5 分といった決まった時間を 1 タップで設定できる機能を作ってみましょう。
  • 正確な時間間隔を鍛えたい方は、秒だけでなくミリ秒まで設定できるようにしてみましょう。
  • タイマーのカウント中に途中経過を知りたい方は、途中経過を音声で知らせてくれる機能を作ってみましょう。

よいスマートデバイスアプリ開発を!

Xamarin.Forms でオリジナルタイマーアプリを作ろう(1)

まえがき

最近「Xamarin の環境は作ったが、ここから何を作って学ぼう?」で悩まれる方がいることを知りました。そこで基礎的な技術を作ってとりあえず動くものを作るサンプルを作ってみました。
題材は、これをもとに独自のパワーアップで学習を継続しやすいもの選んだつもりです。
Xamarin.Forms でアプリを作成しますが、これも初学者の多くの方が関心をもつ点なので採用しています。追加の学習として同じものを Native で作るのも面白いかもしれませんね。
実際にお役に立てるかどうかはこれから検証です。

オリジナルタイマーアプリを作ろうハンズオン

シンプルなタイマーアプリを作ることで Xamarin.Forms によるアプリ作成を体験します。

↓GitHub はこちら

このハンズオンで体験できること

  • Xamarin.Forms によりアプリ作成の第一歩を踏み出せます。
  • 簡単な UI のアプリであれば、非常に高いコード共有率で Android および iOS アプリを作成できることを確認できます。
  • 最近のアプリ作成で良く使われる、MVVM と言われる作り方の基礎を学べます。
  • 基礎的な技術を体験することで Xamarin への敷居を下げることを目的にしています。Xamarin でのベストプラクティスをご提案するものではありません。

技術的なキーワード

  • Xamarin.Forms
  • MVVM(Model-View-ViewModel)
  • データバインディング
  • メッセージング
  • タイマー処理
  • DependencyService

※実現するための技術的基礎を扱っているだけのものもあります。

事前準備

Xamarin.Android および/または Xamarin.iOS の開発環境を整えてください。
Xamarin.Android は Windows と Mac のどちらでも開発できます。Xamarin.iOS は Mac が必要になります。

今回作るアプリ

簡単なタイマーアプリを作成します。
作成したアプリのカスタマイズ (リソースの入れ替え) を行いオリジナルアプリを作成します。

手順

01.プロジェクトの新規作成
02.横画面表示固定の設定
03.背景画像の表示
04.コントロールの説明
05.メインページの作成
06.ViewModelの作成
07.データバインディング
08.メッセージング
09.画面遷移
10.タイマーページの作成
11.タイマー処理
12.DependencyService
13.画面スリープしないようにする
14.TextToSpeech
15.AudioPlayer
16.オリジナルタイマーアプリにしてみよう

↓完成例 ※もし手順通りに作業してもうまくいかない場合、参考にしてください。

01.プロジェクトの新規作成

Xamarin.Forms のプロジェクト(ソリューション)を新規作成します。
プロジェクト名は「MyTimer」で作成します。

Mac の場合

・[新しいプロジェクト] ボタンをクリックします。
f:id:rksoftware:20180520114030j:plain

・[新しいプロジェクト] ウィンドウで [ マルチプラットフォーム > Xamarin.Forms 空白のアプリ C# ] を選択し、[次へ] をクリックします。
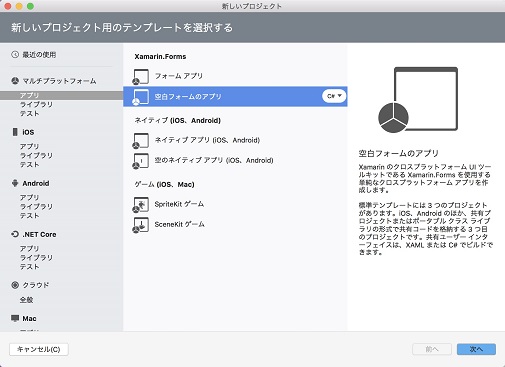
f:id:rksoftware:20180520114051j:plain

・[アプリ名:] に MyTimer と入力します。[組織の識別子:] に世界で一意となりそうな文字列を設定します。[com.{あなたのハンドル}{今日の日付}] などとしておきます。
・[次へ] をクリックします。
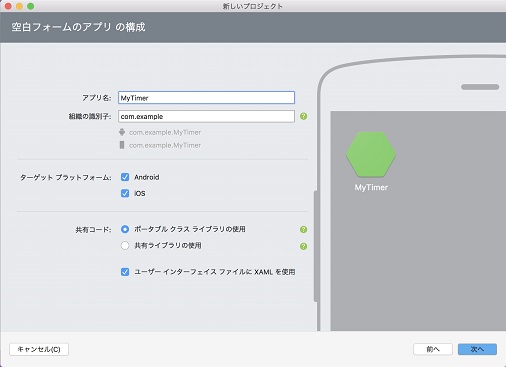
f:id:rksoftware:20180520114111j:plain

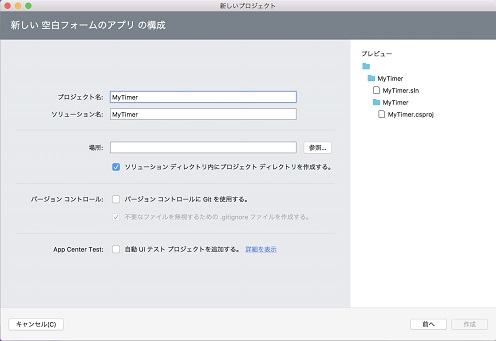
・[プロジェクト名:] および [ソリューション名:] に MyTimer と入力し [作成] をクリックします。
※[場所:] は好きな場所を選択してください。
f:id:rksoftware:20180520114130j:plain

Windows の場合

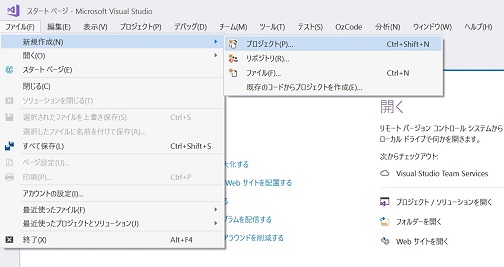
・メニューの [ ファイル > 新規作成 > プロジェクト ] を選択します。
f:id:rksoftware:20180520114206j:plain

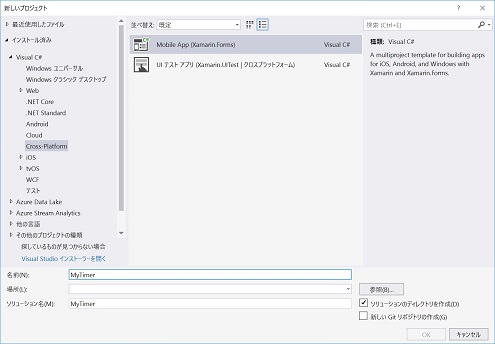
・[新しいプロジェクト] ウィンドウで [ Visual C# > Cross-Platform > Mobile App (Xamarin.Forms) ] を選択します。
・[名前:] に MyTimer と入力し [OK] をクリックします。
※[場所:] は浅い階層のディレクトリで好きな場所を選択してください。パスが短くないとビルドに失敗することがあります。
f:id:rksoftware:20180520114224j:plain

・[New Cross Platform App - MyTimer] ウィンドウで [Select a template:] で [Blank App] を選択します。
・[Platform] は [Android] と [iOS] をチェックし[Windows (UWP)] はチェックを外します。
・[Code Sharing Strategy] は [.NET Standard] を選択し、[OK] を クリックします。
f:id:rksoftware:20180520114243j:plain

ヒント

Android プロジェクトのビルドに失敗する場合

  • NuGet パッケージの復元
  • NuGet パッケージの更新
  • プロジェクトのクリーン
  • 最小 Android バージョンの設定をレベル19以上などに変更

などを試してください。

02.横画面表示固定の設定

今回作成するアプリは画面の回転に対応しない横画面固定のアプリです。
アプリはどのようなサイズ、縦横比の画面でも使用可能であること望ましいですが、今回は簡略化のためスマートフォンの横画面のみを考えて実装します。

iOS の設定 (Mac の場合)

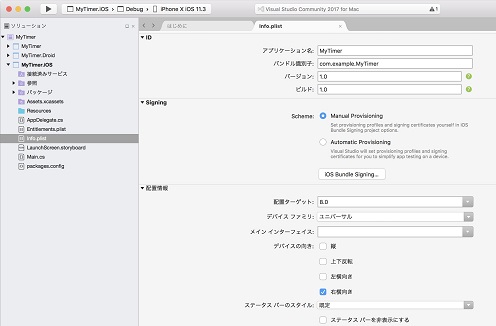
・ソリューションエクスプローラー上で、[MyTimer.iOS > info.plist] をダブルクリックします。
・[配置情報 > デバイスの向き] で [右横向き] だけをチェックし [縦]・[上下反転]・[左横向き] のチェックを外します。
f:id:rksoftware:20180520114307j:plain

iOS の設定 (Windows の場合)

・ソリューションエクスプローラー上で、[MyTimer.iOS > info.plist] をダブルクリックします。
・[アプリケーション > デバイスの向き:] で [横(右回転)] だけをチェックし [縦]・[横(左回転)]・[上下反転] のチェックを外します。
f:id:rksoftware:20180520114327j:plain

Android の設定

Mac の場合
・ソリューションエクスプローラー上で、[MyTimer.Droid > MainActivity.cs] をダブルクリックします。

Windows の場合
・ソリューションエクスプローラー上で、[MyTimer.Android > MainActivity.cs] をダブルクリックします。

Mac・Windows 共通
MainActivity クラスの属性に

, ScreenOrientation =ScreenOrientation.Landscape

を追加します。

追加後のソースコードは次のようになります。

using System;

using Android.App;
using Android.Content.PM;
using Android.Runtime;
using Android.Views;
using Android.Widget;
using Android.OS;

namespace MyTimer.Droid
{
    [Activity(Label = "MyTimer", Icon = "@drawable/icon", Theme = "@style/MainTheme", MainLauncher = true, ConfigurationChanges = ConfigChanges.ScreenSize | ConfigChanges.Orientation, ScreenOrientation = ScreenOrientation.Landscape)]
    public class MainActivity : global::Xamarin.Forms.Platform.Android.FormsAppCompatActivity
    {
        protected override void OnCreate(Bundle bundle)
        {
            TabLayoutResource = Resource.Layout.Tabbar;
            ToolbarResource = Resource.Layout.Toolbar;

            base.OnCreate(bundle);

            global::Xamarin.Forms.Forms.Init(this, bundle);
            LoadApplication(new App());
        }
    }
}

03.背景画像の表示

画面の背景に画像を表示します。
画像ファイルは本来であればプラットフォーム毎のリソースファイルを用意することが望ましいですが、今回は画像ファイルも共通化する手法で実装します。

ImageResourceExtension クラス

画像ファイルを共通化するには、 IMarkupExtension インタフェースを実装した XAML の独自拡張機能クラスを作成します。

クラスの新規作成 (Mac の場合)

・ソリューションエクスプローラー上の [MyTimer] 上で二本指タップ (右クリック) します。
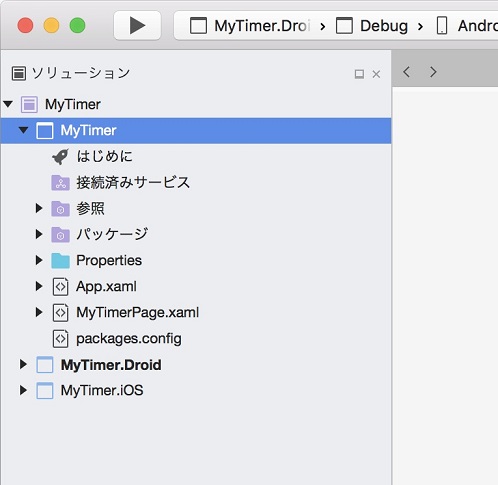
f:id:rksoftware:20180520114733j:plain

・[追加 > 新しいファイル] を選択します。
・[新しいファイル] ウィンドウで [General > 空のクラス] を選択します。
・[名前:] に ImageResourceExtension と入力します。
・[新規] をクリックします。
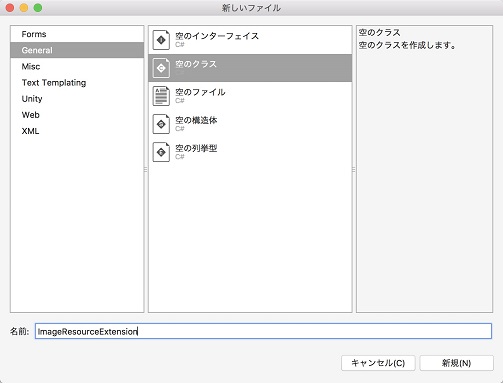
f:id:rksoftware:20180520114751j:plain

クラスの新規作成 (Windows の場合)

・ソリューションエクスプローラー上の [MyTimer] 上で二本指タップ (右クリック) します。
・[追加 > クラス] を選択します。
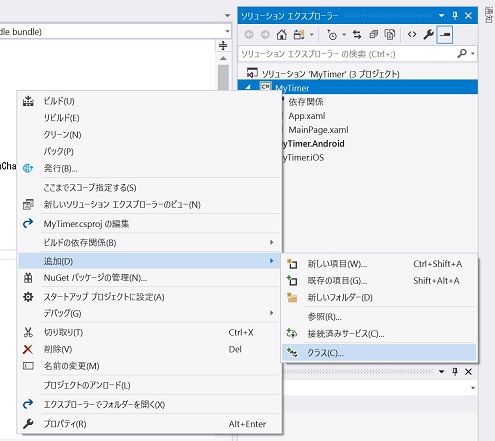
f:id:rksoftware:20180520114809j:plain

・[新しい項目の追加 - MyTimer] ウィンドウで [[名前:] に ImageResourceExtension と入力します。
・[追加] をクリックします。
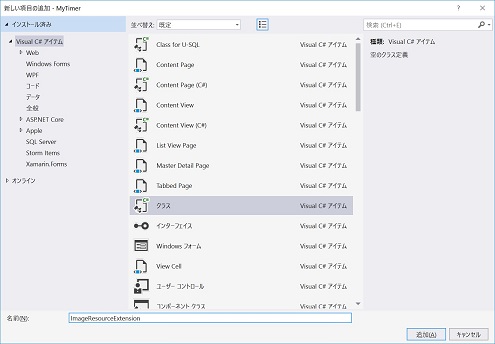
f:id:rksoftware:20180520114825j:plain

Mac・Windows 共通

このクラスの追加操作はこれから何度も行います。
ここで覚えてしまうか、このページを開いておき随時参照できるようにしておいてください。

ImageResourceExtension クラスの実装

クラスファイルの中身を次のように書き換えます。
// リソースから指定のパスの画像を読み込む」というコメントの箇所を変更することで様々な拡張機能を作成できます。
今回はこの 1 クラスしか作成しませんが、このコードは定型コードとして覚えてしまうかメモをして置きましょう。

using System;
using System.Collections.Generic;
using System.Text;
using Xamarin.Forms;
using Xamarin.Forms.Xaml;

namespace MyTimer
{
    // 共通プロジェクトのリソース画像を表示のためのマークアップ拡張
    [ContentProperty("Source")]
    public class ImageResourceExtension : IMarkupExtension
    {
        // リソースファイルのパスを取得または設定する
        public string Source { get; set; }

        // Source で指定されたリソース画像を取得する
        public object ProvideValue(IServiceProvider serviceProvider)
        {
            if (Source == null)
                return null;
            // リソースから指定のパスの画像を読み込む
            var imageSource = ImageSource.FromResource(Source);

            return imageSource;
        }
    }
}

画像ファイルの準備

背景画像ファイルをプロジェクトに追加します。
・次のファイルをダウンロードします。

背景画像ファイル

画像のプロジェクトへの追加 (Mac の場合)

・ソリューションエクスプローラー上の [MyTimer] 上で二本指タップ (右クリック) します。
f:id:rksoftware:20180520114733j:plain

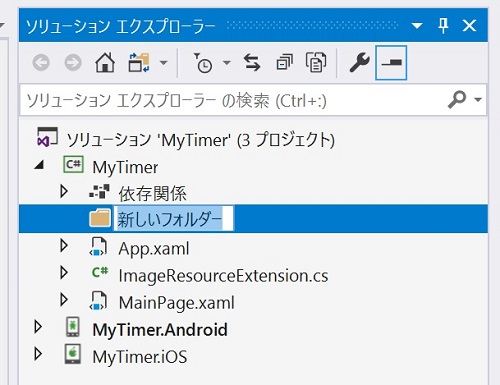
・[追加 > 新しいフォルダー] を選択します。
・フォルダー名の入力モードになるので Resources と入力します。
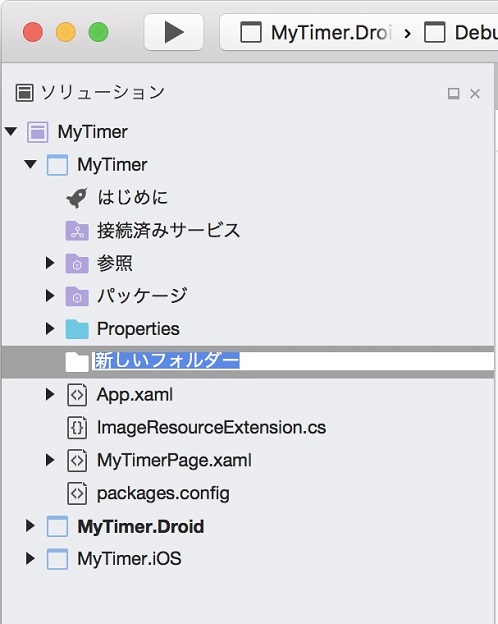
f:id:rksoftware:20180520114937j:plain

・ソリューションエクスプローラー上の作成した Resources フォルダー上で二本指タップ (右クリック) します。
・[追加 > ファイルを追加] を選択します。
・ダウンロードした [背景画像ファイル(Background.png)] を選択し [開く] をクリックします。
・[ファイルをフォルダーに追加する] ウィンドウで [ファイルをディレクトリにコピー します] を選択し [OK] をクリックします。
・ソリューションエクスプローラー上の追加した [背景画像ファイル(Background.png)] 上で二本指タップ(右クリック)します。
・[プロパティ] を選択します。
・プロパティウィンドウ上の [ビルド > ビルド アクション] で [EmbeddedResource] を選択します。
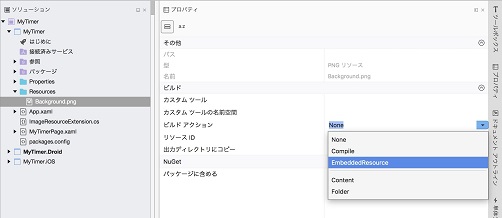
f:id:rksoftware:20180520114955j:plain

画像のプロジェクトへの追加 (Windows の場合)

・ソリューションエクスプローラー上の [MyTimer] 上で二本指タップ(右クリック)します。
・[追加 > 新しいフォルダー] を選択します。
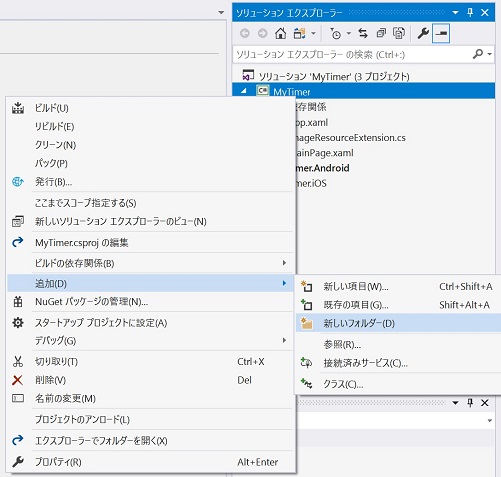
f:id:rksoftware:20180520115018j:plain

・フォルダー名の入力モードになるので Resources と入力します。
f:id:rksoftware:20180520115036j:plain

・ソリューションエクスプローラー上の作成した Resources フォルダー上で二本指タップ (右クリック) します。
・[追加 > 既存の項目] を選択します。
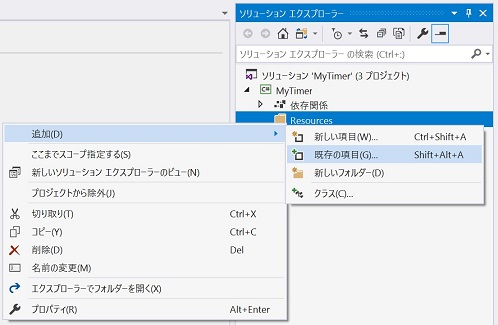
f:id:rksoftware:20180520115053j:plain

・ダウンロードした [背景画像ファイル(Background.png)] を選択し [追加] をクリックします。
※ファイルの種類を、[イメージ ファイル] または [すべてのファイル] にする必要がある事に注意してください。
・ソリューションエクスプローラー上の追加した [背景画像ファイル(Background.png)] 上で二本指タップ (右クリック) します。
・[プロパティ] を選択します。
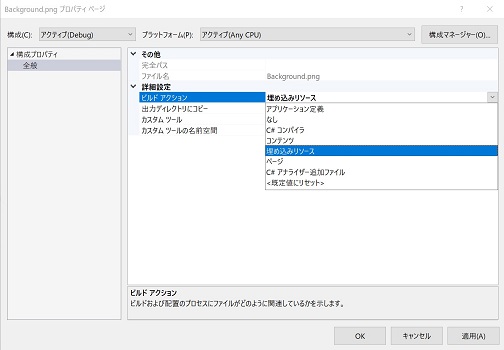
・プロパティウィンドウ上の [詳細設定 > ビルド アクション] で [埋め込みリソース] を選択し [OK] をクリックします。
f:id:rksoftware:20180520115158j:plain

音声ファイルの追加

今回のアプリでは、音声ファイルも同様にリソースとして埋め込み使用します。
同じ手順になるので、ここで追加しておきます。

音声ファイル

[ビルド アクション] の設定を忘れずに行ってください。
Resources フォルダには - Background.png - voice.m4a

の二つのファイルがある状態になります。

背景画像の設定

画面の背景に画像を表示するために MainPage.xaml ファイルを編集します。
ContentPage 要素に xmlns:local 属性を追加し ContentPage.Content 要素内に Image 要素を追加します。
今回は次のコードで MainPage.xaml ファイルの内容を上書きしてください。

<?xml version="1.0" encoding="utf-8" ?>
<ContentPage xmlns="http://xamarin.com/schemas/2014/forms"
             xmlns:x="http://schemas.microsoft.com/winfx/2009/xaml"
             xmlns:local="clr-namespace:MyTimer"
             x:Class="MyTimer.MainPage"
             xmlns:vm="clr-namespace:MyTimer"
             Title="オリジナルタイマーアプリ">
    <!-- ページの表示内容 -->
    <ContentPage.Content>
        <Grid>
            <!-- 背景画像 -->
            <Image Source="{local:ImageResource MyTimer.Resources.Background.png}" Aspect="AspectFit" />
        </Grid>
    </ContentPage.Content>
</ContentPage>

確認

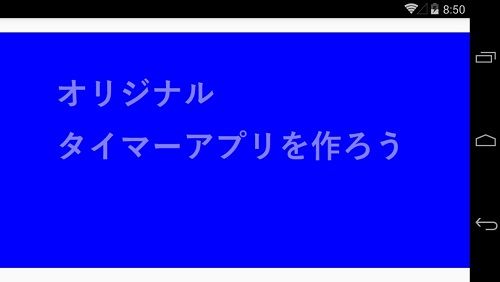
デバッグ実行し、次のように表示されたらこのステップは完了です。
f:id:rksoftware:20180520115227j:plain

04.コントロールの説明

今回のアプリで使う画面コントロールを説明します。

Label

編集不可のテキストを表示します。
アプリのコンテンツ表示の基本でありどのようなアプリでもほぼ必須となるコントロールです。

Button

タップできるテキストを表示します。
OS によっては押せるボタンのような見た目や効果が付きます。
ユーザーによる機能起動に使用します。

Entry

編集可能のテキストを表示します。
ユーザーによる文字入力機能に使用します。

Switch

ON または OFF を表現します。
タップによって ON / OFF を切り替えることができます。
ユーザーによる機能の選択に使用します。

StackLayout

複数の子コントロールをレイアウトして表示します。
子コントロールを縦一列または横一列に並べて表示します。
スマートデバイスのアプリでは、情報を縦に並べて表示する機会が多く非常に出番の多いコントロールです。

Grid

複数の子コントロールをレイアウトして表示します。
自身を複数の行および列の領域に区切り、子要素毎にどの領域に表示するかを設定できます。
うまく使うと、表示するコンテンツやデバイスの画面サイズに応じて柔軟いい感じの表示になるレイアウトを構築できる非常に強力なコントロールです。
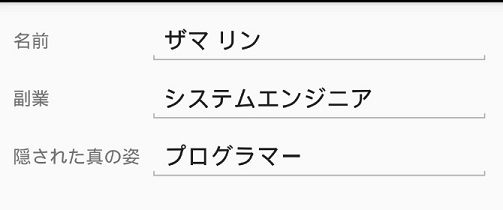
例えば次の例では、入力内容の名前の長さが変わっても文字入力欄の位置がそろいます。

名前が短い
f:id:rksoftware:20180520115252j:plain

名前が長い
f:id:rksoftware:20180520115309j:plain

これらのコントロールを使用して UI を作成して行きます。

05.メインページの作成

メインページの UI を作成します。

使用コントロール

前ページで紹介したコントロールを使用して UI を作成します。
GridStackLayout を使用してレイアウトしています。
後日お時間のある時にゆっくり確認してください。

Grid によるレイアウト

Grid<Grid.RowDefinitions> 要素の子要素 <RowDefinition/> で行を定義します。子要素 <RowDefinition/> の数がレイアウトの持つ行の数になります。
列は <Grid.ColumnDefinitions> 要素の子要素 <ColumnDefinition/> で定義します。

Grid 内にレイアウトされる要素はその行および列の位置を Grid.Row プロパティおよび Grid.Column プロパティで設定します。
この際、一番目の行や列にレイアウトする場合はプロパティの設定を省略できます。
また、行や列を二つ分以上使ったサイズでレイアウトする場合は、その使う行数および列数を Grid.ColumnSpan および Grid.RowSpan プロパティで設定します。

その他のレイアウトプロパティ

  • HorizontalOptions

要素の横位置を設定します。Start で左寄せに、Center で中央寄せに、End で右寄せにレイアウトされます。Fill はその要素が使える範囲を埋めつくすようにレイアウトされます。

  • VerticalOptions

要素の縦位置を設定します。Start で上寄せ、Center で中央寄せ、End で下寄せにレイアウトされます。Fill はその要素が使える範囲を埋めつくすようにレイアウトされます。

  • BackgroundColor

背景色を設定します。色の名前やコードによる指定が可能です。

XAML の編集

MainPage.xaml ファイルを編集します。 今回は次のコードで MainPage.xaml ファイルの内容を上書きしてください。

<?xml version="1.0" encoding="utf-8" ?>
<ContentPage xmlns="http://xamarin.com/schemas/2014/forms"
             xmlns:x="http://schemas.microsoft.com/winfx/2009/xaml"
             xmlns:local="clr-namespace:MyTimer"
             x:Class="MyTimer.MainPage"
             xmlns:vm="clr-namespace:MyTimer"
             Title="オリジナルタイマーアプリ">
    <!-- ページの表示内容 -->
    <ContentPage.Content>
        <Grid>
            <!-- 背景画像 -->
            <Image Source="{local:ImageResource MyTimer.Resources.Background.png}" Aspect="AspectFit" />

            <Grid BackgroundColor="#80FFFFFF">
                <Grid.RowDefinitions>
                    <RowDefinition Height="*"/>
                    <RowDefinition Height="Auto"/>
                    <RowDefinition Height="40"/>
                </Grid.RowDefinitions>
                <Grid.ColumnDefinitions>
                    <ColumnDefinition Width="Auto"/>
                    <ColumnDefinition Width="*"/>
                </Grid.ColumnDefinitions>

                <!-- 設定中のタイマー時間表示 -->
                <Label Text="設定中のタイマー時間表示"
                       Grid.ColumnSpan="2"
                       HorizontalOptions="Fill" VerticalOptions="Fill"
                       BackgroundColor="Red"/>

                <!-- タイマー開始ボタン -->
                <Label Text="開始ボタン"
                       Grid.Row="1" Grid.RowSpan="2"
                       HorizontalOptions="Fill" VerticalOptions="Fill"
                       BackgroundColor="Blue"/>

                <!-- タイマー時間の + - ボタン達 -->
                <Label Text="タイマー時間の + - ボタン達"
                       Grid.Row="1" Grid.Column="1"
                       HorizontalOptions="Fill" VerticalOptions="Fill"
                       BackgroundColor="Yellow"/>

                <!-- カウント後の音声設定 -->
                <Label Text="カウント後の音声設定"
                       Grid.Row="2" Grid.Column="1"
                       HorizontalOptions="Fill" VerticalOptions="Fill"
                       BackgroundColor="Green"/>
            </Grid>
        </Grid>
    </ContentPage.Content>
</ContentPage>

実行

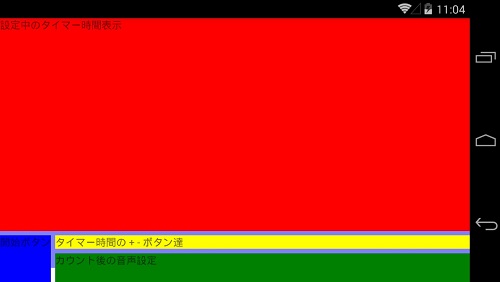
実行をして確認してみます。次のように表示されれば OK です。
f:id:rksoftware:20180520115339j:plain

・レイアウトの構造
赤いラベルは、1 行目の 1~2 列目の領域にレイアウトされています。
青いラベルは、2~3 行目の 1 列目の領域にレイアウトされています。
黄色は、2 行目の 2 列目。緑は、3 行目の 2 列目にレイアウトされています。

StackLayout によるレイアウト

StackLayout 内部にレイアウトされる要素を縦一列または横一列に並べます。並べる方向は、Orientation プロパティで設定します。
Horizontal の場合、横一列に並べます。
Vertical の場合、縦一列に並べます。デフォルト値は Vertical になっているため縦に並べる場合はプロパティを省略できます。
Grid の各領域の内容を StackLayout を活用しながらレイアウトします。

・設定中のタイマー時間表示

 <!-- 設定中のタイマー時間表示 -->
 <Label Text="設定中のタイマー時間表示"
        Grid.ColumnSpan="2"
        HorizontalOptions="Fill" VerticalOptions="Fill"
        BackgroundColor="Red"/>

<!-- 設定中のタイマー時間表示 -->
<Label Text="00:00"
    Grid.ColumnSpan="2"
    HorizontalOptions="Center" VerticalOptions="Center"
    FontSize="Large" TextColor="Black" FontAttributes="Bold"/>

と書き換えます。

・タイマー開始ボタン

 <!-- タイマー開始ボタン -->
 <Label Text="開始ボタン"
        Grid.Row="1" Grid.RowSpan="2"
        HorizontalOptions="Fill" VerticalOptions="Fill"
        BackgroundColor="Blue"/>

<!-- タイマー開始ボタン -->
<Button Text="タイマー開始"
    Grid.Row="1" Grid.RowSpan="2"
    BackgroundColor="#80808080"/>

と書き換えます。

・タイマー時間の + - ボタン達

<!-- タイマー時間の + - ボタン達 -->
<Label Text="タイマー時間の + - ボタン達"
       Grid.Row="1" Grid.Column="1"
       HorizontalOptions="Fill" VerticalOptions="Fill"
       BackgroundColor="Yellow"/>

<!-- タイマー時間の + - ボタン達 -->
<StackLayout Orientation="Horizontal"
    Grid.Row="1" Grid.Column="1"
    HorizontalOptions="Center">
    <!-- 分の + - ボタン達 -->
    <StackLayout>
        <!-- 「分」 ラベル -->
        <Label Text="分" HorizontalOptions="Center" TextColor="Black" FontAttributes="Bold"/>
        <!-- + - ボタン達  -->
        <StackLayout Orientation="Horizontal">
            <!-- 10の位設定 -->
            <StackLayout>
                <Label Text="10" HorizontalOptions="Center" TextColor="Black" FontAttributes="Bold"/>
                <Button Text="+" BackgroundColor="#80808080"/>
                <Button Text="ー" BackgroundColor="#80808080"/>
            </StackLayout>
            <!-- 1の位設定 -->
            <StackLayout>
                <Label Text="1" HorizontalOptions="Center" TextColor="Black" FontAttributes="Bold"/>
                <Button Text="+" BackgroundColor="#80808080"/>
                <Button Text="ー" BackgroundColor="#80808080"/>
            </StackLayout>
        </StackLayout>
    </StackLayout>
    <!-- 秒の + - ボタン達 -->
    <StackLayout>
        <!-- 「秒」 ラベル -->
        <Label Text="秒" HorizontalOptions="Center" TextColor="Black" FontAttributes="Bold"/>
        <!-- + - ボタン達  -->
        <StackLayout Orientation="Horizontal">
            <!-- 10の位設定 -->
            <StackLayout>
                <Label Text="10" HorizontalOptions="Center" TextColor="Black" FontAttributes="Bold"/>
                <Button Text="+" BackgroundColor="#80808080"/>
                <Button Text="ー" BackgroundColor="#80808080"/>
            </StackLayout>
            <!-- 1の位設定 -->
            <StackLayout>
                <Label Text="1" HorizontalOptions="Center" TextColor="Black" FontAttributes="Bold"/>
                <Button Text="+" BackgroundColor="#80808080"/>
                <Button Text="ー" BackgroundColor="#80808080"/>
            </StackLayout>
        </StackLayout>
    </StackLayout>
</StackLayout>

と書き換えます。

・カウント後の音声設定

<!-- カウント後の音声設定 -->
<Label Text="カウント後の音声設定"
       Grid.Row="2" Grid.Column="1"
       HorizontalOptions="Fill" VerticalOptions="Fill"
       BackgroundColor="Green"/>

<!-- カウント後の音声設定 -->
<Grid Grid.Row="2" Grid.Column="1">
    <Grid.ColumnDefinitions>
        <ColumnDefinition Width="Auto"/>
        <ColumnDefinition Width="*"/>
    </Grid.ColumnDefinitions>
    <!-- テキスト読み上げ or 音声ファイル の選択 Switch -->
    <Switch x:Name="useSpeechText"/>
    <Grid Grid.Column="1">
        <!-- 音声ファイルを使用ラベル -->
        <Label Text="音声ファイルを使用"
            HorizontalOptions="Fill" VerticalOptions="Center" HorizontalTextAlignment="Start"
            TextColor="Black" FontAttributes="Bold"/>
        <!-- テキスト読み上げのテキスト -->
        <Editor
            HorizontalOptions="Fill"
            IsVisible="{Binding IsToggled, Source={x:Reference useSpeechText}" BackgroundColor="White"/>
    </Grid>
</Grid>

と書き換えます。

現在のコード

ここまでの手順を終えた現在の MainPage.xaml は次のようになっています。

<?xml version="1.0" encoding="utf-8" ?>
<ContentPage xmlns="http://xamarin.com/schemas/2014/forms"
             xmlns:x="http://schemas.microsoft.com/winfx/2009/xaml"
             xmlns:local="clr-namespace:MyTimer"
             x:Class="MyTimer.MainPage"
             xmlns:vm="clr-namespace:MyTimer"
             Title="オリジナルタイマーアプリ">
    <!-- ページの表示内容 -->
    <ContentPage.Content>
        <Grid>
            <!-- 背景画像 -->
            <Image Source="{local:ImageResource MyTimer.Resources.Background.png}" Aspect="AspectFit" />

            <Grid BackgroundColor="#80FFFFFF">
                <Grid.RowDefinitions>
                    <RowDefinition Height="*"/>
                    <RowDefinition Height="Auto"/>
                    <RowDefinition Height="40"/>
                </Grid.RowDefinitions>
                <Grid.ColumnDefinitions>
                    <ColumnDefinition Width="Auto"/>
                    <ColumnDefinition Width="*"/>
                </Grid.ColumnDefinitions>

                <!-- 設定中のタイマー時間表示 -->
                <Label Text="00:00"
                    Grid.ColumnSpan="2"
                    HorizontalOptions="Center" VerticalOptions="Center"
                    FontSize="Large" TextColor="Black" FontAttributes="Bold"/>

                <!-- タイマー開始ボタン -->
                <Button Text="タイマー開始"
                    Grid.Row="1" Grid.RowSpan="2"
                    BackgroundColor="#80808080"/>

                <!-- タイマー時間の + - ボタン達 -->
                <StackLayout Orientation="Horizontal"
                    Grid.Row="1" Grid.Column="1"
                    HorizontalOptions="Center">
                    <!-- 分の + - ボタン達 -->
                    <StackLayout>
                        <!-- 「分」 ラベル -->
                        <Label Text="分" HorizontalOptions="Center" TextColor="Black" FontAttributes="Bold"/>
                        <!-- + - ボタン達  -->
                        <StackLayout Orientation="Horizontal">
                            <!-- 10の位設定 -->
                            <StackLayout>
                                <Label Text="10" HorizontalOptions="Center" TextColor="Black" FontAttributes="Bold"/>
                                <Button Text="+" BackgroundColor="#80808080"/>
                                <Button Text="ー" BackgroundColor="#80808080"/>
                            </StackLayout>
                            <!-- 1の位設定 -->
                            <StackLayout>
                                <Label Text="1" HorizontalOptions="Center" TextColor="Black" FontAttributes="Bold"/>
                                <Button Text="+" BackgroundColor="#80808080"/>
                                <Button Text="ー" BackgroundColor="#80808080"/>
                            </StackLayout>
                        </StackLayout>
                    </StackLayout>
                    <!-- 秒の + - ボタン達 -->
                    <StackLayout>
                        <!-- 「秒」 ラベル -->
                        <Label Text="秒" HorizontalOptions="Center" TextColor="Black" FontAttributes="Bold"/>
                        <!-- + - ボタン達  -->
                        <StackLayout Orientation="Horizontal">
                            <!-- 10の位設定 -->
                            <StackLayout>
                                <Label Text="10" HorizontalOptions="Center" TextColor="Black" FontAttributes="Bold"/>
                                <Button Text="+" BackgroundColor="#80808080"/>
                                <Button Text="ー" BackgroundColor="#80808080"/>
                            </StackLayout>
                            <!-- 1の位設定 -->
                            <StackLayout>
                                <Label Text="1" HorizontalOptions="Center" TextColor="Black" FontAttributes="Bold"/>
                                <Button Text="+" BackgroundColor="#80808080"/>
                                <Button Text="ー" BackgroundColor="#80808080"/>
                            </StackLayout>
                        </StackLayout>
                    </StackLayout>
                </StackLayout>

                <!-- カウント後の音声設定 -->
                <Grid Grid.Row="2" Grid.Column="1">
                    <Grid.ColumnDefinitions>
                        <ColumnDefinition Width="Auto"/>
                        <ColumnDefinition Width="*"/>
                    </Grid.ColumnDefinitions>
                    <!-- テキスト読み上げ or 音声ファイル の選択 Switch -->
                    <Switch x:Name="useSpeechText"/>
                    <Grid Grid.Column="1">
                        <!-- 音声ファイルを使用ラベル -->
                        <Label Text="音声ファイルを使用"
                            HorizontalOptions="Fill" VerticalOptions="Center" HorizontalTextAlignment="Start"
                            TextColor="Black" FontAttributes="Bold"/>
                        <!-- テキスト読み上げのテキスト -->
                        <Editor
                            HorizontalOptions="Fill"
                            IsVisible="{Binding IsToggled, Source={x:Reference useSpeechText}" BackgroundColor="White"/>
                    </Grid>
                </Grid>
            </Grid>
        </Grid>
    </ContentPage.Content>
</ContentPage>

デバッグ実行

デバッグ実行をします。
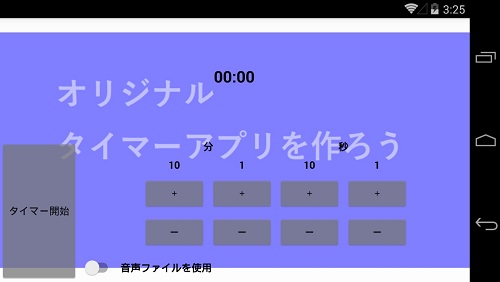
次のように表示されたら、このページは完了です。
f:id:rksoftware:20180520115417j:plain

06.ViewModelの作成

画面のデータと機能を持つ ViewModel クラスを作成します。
本来は機能は Model クラスに持つことが望ましいですが、今回は手順を減らすために ViewModel クラスに実装します。

クラスの新規作成

MyTimer プロジェクト( 共有コードプロジェクト) に次の二つのクラスを作成します。
クラスの作成方法は [背景画像の表示] で学んでいます。思い出しながら作成してください。
中身は初期状態のままで OK です。

  • MainPageViewModel クラス
  • BindableBase クラス

BindableBase の実装

次ページで解説するデータバインディングを実装するためのクラスです。
このクラスは定型処理として毎回コピー&ペーストで再利用して構いません。
中身については理解に比較的高度な C# 力が要求されまので、今回はコピー&ペーストで済ませてしまいましょう。
中身は時間のある時にゆっくりと確認してください。INotifyPropertyChanged インタフェースがポイントなので、これをキーワードに調べると良いでしょう。

今回は次のコードで BindableBase.cs ファイルの内容を上書きしてください。

using System;
using System.Collections.Generic;
using System.ComponentModel;
using System.Runtime.CompilerServices;
using System.Text;

namespace MyTimer
{
    // プロパティの変更通知機能を持ったモデルクラスのベースクラス
    // 実際としては ViewModel クラスのベースクラス
    class BindableBase : INotifyPropertyChanged
    {
        // プロパティ変更通知イベント
        public event PropertyChangedEventHandler PropertyChanged;

        //プロパティ変更通知イベントを発生させる
        protected void OnPropertyChanged([CallerMemberName] string propertyName = null)
        {
            PropertyChanged?.Invoke(this, new PropertyChangedEventArgs(propertyName));
        }

        // プロパティの値をセットする
        // プロパティの値が変更されない場合はセットをしない
        // プロパティの値が変更される場合は値を更新し、変更通知のイベントを発生させる
        protected bool SetProperty<T>(ref T property, T value, [CallerMemberName] string propertyName = null)
        {
            if (object.Equals(property, value)) return false;
            property = value;
            OnPropertyChanged(propertyName);
            return true;
        }
    }
}

MainPageViewModel の実装

メインページのデータと機能を持つクラスです。
ViewModel クラスは、次ページで解説するデータバインディングを実装するために BindableBase クラスを基底クラス (ベースクラスやスーパークラスなどとも呼ばれる) として継承した派生クラス (導出クラスやサブクラスなどとも呼ばれる) として実装します。

C# では基底クラスの指定は、クラス名 に続けて : + 基底クラス名 を記述します。
今回は次のコードで MainPageViewModel.cs ファイルの内容を上書きしてください。

using System;
using System.Collections.Generic;
using System.Text;
using Xamarin.Forms;

namespace MyTimer
{
    // 起動直後のタイマー設定画面の ViewModel
    class MainPageViewModel : BindableBase
    {

    }
}

データを保持するプロパティの実装

MainPageViewModel クラスにページのデータをもつプロパティを定義します。
プロパティとは、クラスの外から値の設定または取得のできるメンバーで、今回は View から値の設定と取得が行われます。
次のコードで出てくる SetProperty メソッドは BindableBase クラスに実装したメソッドで、値が変更されたことを View に通知してくれるすごいメソッドです。

次のコードを MainPageViewModel クラスに追加してください。

// **画面の値とバインディングするプロパティ**

// タイマー時間
private TimeSpan _time = TimeSpan.FromMinutes(5);
public TimeSpan Time { get { return _time; }set { SetProperty(ref _time, value); } }

// タイマー時間経過後の案内音声
private string _speechText = "Time haspassed";
public string SpeechText { get { return _speechText; } set { SetProperty(ref _speechText, value); } }

// タイマー時間経過後に案内音声を使うか?(使わない場合、Audio 再生)
private bool _useSpeechText = true;
public bool UseSpeechText { get { return _useSpeechText; } set { SetProperty(ref _useSpeechText, value); } }

ここまでの手順を終えた MainPageViewModel.cs は次のようになっています。

using System;
using System.Collections.Generic;
using System.Text;
using Xamarin.Forms;

namespace MyTimer
{
    // 起動直後のタイマー設定画面の ViewModel
    class MainPageViewModel : BindableBase
    {
        // **画面の値とバインディングするプロパティ**

        // タイマー時間
        private TimeSpan _time = TimeSpan.FromMinutes(5);
        public TimeSpan Time { get { return _time; } set { SetProperty(ref _time, value); } }

        // タイマー時間経過後の案内音声
        private string _speechText = "Time haspassed";
        public string SpeechText { get { return _speechText; } set { SetProperty(ref _speechText, value); } }

        // タイマー時間経過後に案内音声を使うか?(使わない場合、Audio 再生)
        private bool _useSpeechText = true;
        public bool UseSpeechText { get { return _useSpeechText; } set { SetProperty(ref _useSpeechText, value); } }
    }
}

コマンドプロパティの実装

MainPageViewModel クラスにページの機能の呼び出し口となるコマンドを定義します。
コマンドとは、プロパティと同じようにクラスの外から参照できるメンバーで、 View からの取得だけが行われます。多くは View のボタンなどに紐づけられ、ボタンが押された際にコマンドを通じて ViewModel の機能が呼び出されます。

次のコードを MainPageViewModel クラスに追加してください。

// **画面のボタンとバインディングするコマンド**

// 開始ボタンが押された
public Command StartCommand { get; }

// 秒 +/- ボタンが押された
public Command AddSecondsCommand { get; }

// 分 +/- ボタンが押された
public Command AddMinutesCommand { get; }

ここまでの手順を終えた現在の MainPageViewModel.cs は次のようになっています。

using System;
using System.Collections.Generic;
using System.Text;
using Xamarin.Forms;

namespace MyTimer
{
    // 起動直後のタイマー設定画面の ViewModel
    class MainPageViewModel : BindableBase
    {
        // **画面の値とバインディングするプロパティ**

        // タイマー時間
        private TimeSpan _time = TimeSpan.FromMinutes(5);
        public TimeSpan Time { get { return _time; } set { SetProperty(ref _time, value); } }

        // タイマー時間経過後の案内音声
        private string _speechText = "Time haspassed";
        public string SpeechText { get { return _speechText; } set { SetProperty(ref _speechText, value); } }

        // タイマー時間経過後に案内音声を使うか?(使わない場合、Audio 再生)
        private bool _useSpeechText = true;
        public bool UseSpeechText { get { return _useSpeechText; } set { SetProperty(ref _useSpeechText, value); } }


        // **画面のボタンとバインディングするコマンド**

        // 開始ボタンが押された
        public Command StartCommand { get; }

        // 秒 +/- ボタンが押された
        public Command AddSecondsCommand { get; }

        // 分 +/- ボタンが押された
        public Command AddMinutesCommand { get; }
    }
}

機能の実装

MainPageViewModel クラスにページの機能を実装します。

機能はコマンドを通じて呼び出されるため外部から参照できる必要はありません。そのため private メソッドとして実装します。
次のコードを MainPageViewModel クラスに追加してください。

・ParseLong メソッド
文字列を数値に変換するメソッドです。

// **複数個所で行われる処理をメソッド化したメソッド**

// object (中身は string) を long に parse する
private long ParseLong(object arg)
{
    if (long.TryParse(arg?.ToString(), out var value))
        return value;
    return default(long);
}

・AddTime メソッド
タイマー設定時間を増減するメソッドで、Time プロパティの値を変更します。マイナス値を設定することで値の減少ができます。 内部で、ParseLong メソッドを使用します。

// タイマー時間を追加する
private void AddTime(long seconds)
{
    var newTime = Time.TotalSeconds + seconds;

    // 必ず 1 秒以上 60 分未満となるよう調整する
    newTime = Math.Max(1, newTime);
    newTime = Math.Min((60 * 60) - 1, newTime);

    Time = TimeSpan.FromSeconds(newTime);
}

・AddSeconds メソッド
タイマー設定時間の秒を増減するメソッドです。マイナス値を設定することで値の減少ができます。
内部で、AddTime メソッドを使用します。

// **コマンドの中身となるボタンが押された際の処理メソッド**

// 秒 +/- ボタンが押された際の処理
private void AddSeconds(object parameter)
{
    long value = ParseLong(parameter);
    AddTime(value);
}

・AddMinutes メソッド
タイマー設定時間の分を増減するメソッドです。マイナス値を設定することで値の減少ができます。
内部で、AddTime メソッドを使用します。

// 分 +/- ボタンが押された際の処理
private void AddMinutes(object parameter)
{
    long value = ParseLong(parameter);
    AddTime(value * 60);
}

Start メソッド
タイマーのカウント画面へ遷移し、タイマーを開始します。実装は後の手順で行います。

// 開始ボタンが押された際の処理
private void Start()
{
}

コンストラクタの実装 (コマンドのインスタンス化)

MainPageViewModel クラスのコンストラクタでコマンドのインスタンス化を行います。
C# ではコンストラクタ内で読み取り専用プロパティの値の設定が行えます (コマンドは読み取り専用プロパティとして宣言しています) 。
※読み取り専用なので、通常のメソッド内では値の設定は行えません。

次のコードを MainPageViewModel クラスに追加してください。

// **コンストラクタ**

// コンストラクタ
public MainPageViewModel()
{
    // コマンドの設定
    // readonly プロパティの初期化は、コンストラクタ内でも行える
    AddSecondsCommand = new Command(AddSeconds);
    AddMinutesCommand = new Command(AddMinutes);
    StartCommand = new Command(Start);
}

ここまでの手順を終えた MainPageViewModel.cs は次のようになっています。

using System;
using System.Collections.Generic;
using System.Text;
using Xamarin.Forms;

namespace MyTimer
{
    // 起動直後のタイマー設定画面の ViewModel
    class MainPageViewModel : BindableBase
    {
        // **画面の値とバインディングするプロパティ**

        // タイマー時間
        private TimeSpan _time = TimeSpan.FromMinutes(5);
        public TimeSpan Time { get { return _time; } set { SetProperty(ref _time, value); } }

        // タイマー時間経過後の案内音声
        private string _speechText = "Time haspassed";
        public string SpeechText { get { return _speechText; } set { SetProperty(ref _speechText, value); } }

        // タイマー時間経過後に案内音声を使うか?(使わない場合、Audio 再生)
        private bool _useSpeechText = true;
        public bool UseSpeechText { get { return _useSpeechText; } set { SetProperty(ref _useSpeechText, value); } }


        // **画面のボタンとバインディングするコマンド**

        // 開始ボタンが押された
        public Command StartCommand { get; }

        // 秒 +/- ボタンが押された
        public Command AddSecondsCommand { get; }

        // 分 +/- ボタンが押された
        public Command AddMinutesCommand { get; }


        // **複数個所で行われる処理をメソッド化したメソッド**

        // object (中身は string) を long に parse する
        private long ParseLong(object arg)
        {
            if (long.TryParse(arg?.ToString(), out var value))
                return value;
            return default(long);
        }

        // タイマー時間を追加する
        private void AddTime(long seconds)
        {
            var newTime = Time.TotalSeconds + seconds;

            // 必ず 1 秒以上 60 分未満となるよう調整する
            newTime = Math.Max(1, newTime);
            newTime = Math.Min((60 * 60) - 1, newTime);

            Time = TimeSpan.FromSeconds(newTime);
        }


        // **コマンドの中身となるボタンが押された際の処理メソッド**

        // 秒 +/- ボタンが押された際の処理
        private void AddSeconds(object parameter)
        {
            long value = ParseLong(parameter);
            AddTime(value);
        }

        // 分 +/- ボタンが押された際の処理
        private void AddMinutes(object parameter)
        {
            long value = ParseLong(parameter);
            AddTime(value * 60);
        }

        // 開始ボタンが押された際の処理
        private void Start()
        {
        }


        // **コンストラクタ**

        // コンストラクタ
        public MainPageViewModel()
        {
            // コマンドの設定
            // readonly プロパティの初期化は、コンストラクタ内でも行える
            AddSecondsCommand = new Command(AddSeconds);
            AddMinutesCommand = new Command(AddMinutes);
            StartCommand = new Command(Start);
        }
    }
}

07.データバインディング

View と ViewModel とでデータを同期するデータバインディングを設定します。

ViewModel の実装

ViewModel の実装は前ページの手順で完了しています。

View の実装

ViewModel のプロパティと View 要素をデータバインディングによりバインディングします。
データバインディングにより、View の値と ViewModel の値が同期し、一方が変わるともう一方も変わるようになります。
また、ボタンタップ時にはバインディングされた ViewModel のコマンドプロパティの処理が実行されます。

BindingContext ぼ設定

View にバインディングされる ViewModel を指定します。
MainPage.xamlContentPage の子要素として、次のコードを追加してください。

<!-- ViewModel を設定、構築 -->
<ContentPage.BindingContext>
    <vm:MainPageViewModel />
</ContentPage.BindingContext>

貼り付け後は次のようになります。 (抜粋)

<?xml version="1.0" encoding="utf-8" ?>
<ContentPage xmlns="http://xamarin.com/schemas/2014/forms"
             xmlns:x="http://schemas.microsoft.com/winfx/2009/xaml"
             xmlns:local="clr-namespace:MyTimer"
             x:Class="MyTimer.MainPage"
             xmlns:vm="clr-namespace:MyTimer"
             Title="オリジナルタイマーアプリ">
    <!-- ViewModel を設定、構築 -->
    <ContentPage.BindingContext>
        <vm:MainPageViewModel />
    </ContentPage.BindingContext>

    <!-- ページの表示内容 -->
    <ContentPage.Content>

XAML はオブジェクトを構築する設計書です。
ここでは、ContentPage オブジェクトの BindingContext プロパティに ```MainPageViewModel‘‘‘ クラスをインスタンス化し設定する、という指定をしています。

値のバインディング

View の値と ViewModel のプロパティをバインディングします。
「設定中のタイマー時間表示」 とコメントのついたラベルを次のように書き換えます。

<!-- 設定中のタイマー時間表示 -->
<Label Text="{Binding Time, StringFormat='{0:mm\\:ss}'}"
    Grid.ColumnSpan="2"
    HorizontalOptions="Center" VerticalOptions="Center"
    FontSize="Large" TextColor="Black" FontAttributes="Bold"/>

この {Binding の後に書かれた名前の ViewModel のプロパティがこのラベルのテキストと同期されるようになります。
また、StringFormat を指定することにより表示のフォーマットを指定できます。ここでは 「00:00」(分:秒) というフォーマットで表示される指定をしています。

同様に他の値もバインディングします。

「テキスト読み上げ or 音声ファイル の選択 Switch」 とコメントのついたスイッチを次のように書き換えます。

<Switch x:Name="useSpeechText" IsToggled="{Binding UseSpeechText}" />

「テキスト読み上げのテキスト」 とコメントのついたエディターを次のように書き換えます。

<Editor Text="{Binding SpeechText}"
    HorizontalOptions="Fill"
    IsVisible="{Binding IsToggled, Source={x:Reference useSpeechText}" BackgroundColor="White"/>

IsVisible にも {Binding とありますが、このように書くことで View の要素同士で値のバインディングが可能です。
ここでは、スイッチの選択に応じてエディターが表示/非表示が切り替わります。

コマンドのバインディング

コマンドをボタンの Command プロパティにバインディングします。

「タイマー開始ボタン」 とコメントのついたボタンを次のように書き換えます。

<!-- タイマー開始ボタン -->
<Button Text="タイマー開始" Command="{Binding StartCommand}" 
    Grid.Row="1" Grid.RowSpan="2"
    BackgroundColor="#80808080"/>

パラメーター付きのコマンドのバインディング

タイマー設定時間を増減するボタンにコマンドをバインディングします。
コマンドのバインディングは値のバインディングと異なり、CommandParameter を指定できます。CommandParameter で指定された値はそのコマンドが実行されたときにメソッドの引数として渡されます。
今回はタイマー設定の増減ボタンそれぞれの CommandParameter で、「1、-1、10、-10」に設定することで、一つのコマンドで

  • 10 の位の増
  • 10 の位の減
  • 1 の位の増
  • 1 の位の減

を実現しています。

「「分」 ラベル」 というコメントの 4 行下の 「10の位設定」 とコメントのついた StackLayout を次のように書き換えます。

<!-- 10の位設定 -->
<StackLayout>
    <Label Text="10" HorizontalOptions="Center" TextColor="Black" FontAttributes="Bold"/>
    <Button Text="+" Command="{Binding AddMinutesCommand}" CommandParameter="10" BackgroundColor="#80808080"/>
    <Button Text="ー" Command="{Binding AddMinutesCommand}" CommandParameter="-10" BackgroundColor="#80808080"/>
</StackLayout>

同様にすぐ下の 「1の位設定」 とコメントのついた StackLayout を次のように書き換えます。

<!-- 1の位設定 -->
<StackLayout>
    <Label Text="1" HorizontalOptions="Center" TextColor="Black" FontAttributes="Bold"/>
    <Button Text="+" Command="{Binding AddMinutesCommand}" CommandParameter="1" BackgroundColor="#80808080"/>
    <Button Text="ー" Command="{Binding AddMinutesCommand}" CommandParameter="-1" BackgroundColor="#80808080"/>
</StackLayout>

同様に、秒単位の設定ボタンにもバインディングします。
コメントのついた StackLayout を次のように書き換えます。

<!-- 秒の + - ボタン達 -->
<StackLayout>
    <!-- 「秒」 ラベル -->
    <Label Text="秒" HorizontalOptions="Center" TextColor="Black" FontAttributes="Bold"/>
    <!-- + - ボタン達  -->
    <StackLayout Orientation="Horizontal">
        <!-- 10の位設定 -->
        <StackLayout>
            <Label Text="10" HorizontalOptions="Center" TextColor="Black" FontAttributes="Bold"/>
            <Button Text="+" Command="{Binding AddSecondsCommand}" CommandParameter="10" BackgroundColor="#80808080"/>
            <Button Text="ー" Command="{Binding AddSecondsCommand}" CommandParameter="-10" BackgroundColor="#80808080"/>
        </StackLayout>
        <!-- 1の位設定 -->
        <StackLayout>
            <Label Text="1" HorizontalOptions="Center" TextColor="Black" FontAttributes="Bold"/>
            <Button Text="+" Command="{Binding AddSecondsCommand}" CommandParameter="1" BackgroundColor="#80808080"/>
            <Button Text="ー" Command="{Binding AddSecondsCommand}" CommandParameter="-1" BackgroundColor="#80808080"/>
        </StackLayout>
    </StackLayout>
</StackLayout>

ここまでの手順を終えた MainPageViewModel.cs は次のようになっています。

<?xml version="1.0" encoding="utf-8" ?>
<ContentPage xmlns="http://xamarin.com/schemas/2014/forms"
             xmlns:x="http://schemas.microsoft.com/winfx/2009/xaml"
             xmlns:local="clr-namespace:MyTimer"
             x:Class="MyTimer.MainPage"
             xmlns:vm="clr-namespace:MyTimer"
             Title="オリジナルタイマーアプリ">
    <!-- ViewModel を設定、構築 -->
    <ContentPage.BindingContext>
        <vm:MainPageViewModel />
    </ContentPage.BindingContext>

    <!-- ページの表示内容 -->
    <ContentPage.Content>
        <Grid>
            <!-- 背景画像 -->
            <Image Source="{local:ImageResource MyTimer.Resources.Background.png}" Aspect="AspectFit" />

            <Grid BackgroundColor="#80FFFFFF">
                <Grid.RowDefinitions>
                    <RowDefinition Height="*"/>
                    <RowDefinition Height="Auto"/>
                    <RowDefinition Height="40"/>
                </Grid.RowDefinitions>
                <Grid.ColumnDefinitions>
                    <ColumnDefinition Width="Auto"/>
                    <ColumnDefinition Width="*"/>
                </Grid.ColumnDefinitions>

                <!-- 設定中のタイマー時間表示 -->
                <Label Text="{Binding Time, StringFormat='{0:mm\\:ss}'}"
                    Grid.ColumnSpan="2"
                    HorizontalOptions="Center" VerticalOptions="Center"
                    FontSize="Large" TextColor="Black" FontAttributes="Bold"/>

                <!-- タイマー開始ボタン -->
                <Button Text="タイマー開始" Command="{Binding StartCommand}" 
                    Grid.Row="1" Grid.RowSpan="2"
                    BackgroundColor="#80808080"/>

                <!-- タイマー時間の + - ボタン達 -->
                <StackLayout Orientation="Horizontal"
                    Grid.Row="1" Grid.Column="1"
                    HorizontalOptions="Center">
                    <!-- 分の + - ボタン達 -->
                    <StackLayout>
                        <!-- 「分」 ラベル -->
                        <Label Text="分" HorizontalOptions="Center" TextColor="Black" FontAttributes="Bold"/>
                        <!-- + - ボタン達  -->
                        <StackLayout Orientation="Horizontal">
                            <!-- 10の位設定 -->
                            <StackLayout>
                                <Label Text="10" HorizontalOptions="Center" TextColor="Black" FontAttributes="Bold"/>
                                <Button Text="+" Command="{Binding AddMinutesCommand}" CommandParameter="10" BackgroundColor="#80808080"/>
                                <Button Text="ー" Command="{Binding AddMinutesCommand}" CommandParameter="-10" BackgroundColor="#80808080"/>
                            </StackLayout>
                            <!-- 1の位設定 -->
                            <StackLayout>
                                <Label Text="1" HorizontalOptions="Center" TextColor="Black" FontAttributes="Bold"/>
                                <Button Text="+" Command="{Binding AddMinutesCommand}" CommandParameter="1" BackgroundColor="#80808080"/>
                                <Button Text="ー" Command="{Binding AddMinutesCommand}" CommandParameter="-1" BackgroundColor="#80808080"/>
                            </StackLayout>
                        </StackLayout>
                    </StackLayout>
                    <!-- 秒の + - ボタン達 -->
                    <StackLayout>
                        <!-- 「秒」 ラベル -->
                        <Label Text="秒" HorizontalOptions="Center" TextColor="Black" FontAttributes="Bold"/>
                        <!-- + - ボタン達  -->
                        <StackLayout Orientation="Horizontal">
                            <!-- 10の位設定 -->
                            <StackLayout>
                                <Label Text="10" HorizontalOptions="Center" TextColor="Black" FontAttributes="Bold"/>
                                <Button Text="+" Command="{Binding AddSecondsCommand}" CommandParameter="10" BackgroundColor="#80808080"/>
                                <Button Text="ー" Command="{Binding AddSecondsCommand}" CommandParameter="-10" BackgroundColor="#80808080"/>
                            </StackLayout>
                            <!-- 1の位設定 -->
                            <StackLayout>
                                <Label Text="1" HorizontalOptions="Center" TextColor="Black" FontAttributes="Bold"/>
                                <Button Text="+" Command="{Binding AddSecondsCommand}" CommandParameter="1" BackgroundColor="#80808080"/>
                                <Button Text="ー" Command="{Binding AddSecondsCommand}" CommandParameter="-1" BackgroundColor="#80808080"/>
                            </StackLayout>
                        </StackLayout>
                    </StackLayout>
                </StackLayout>

                <!-- カウント後の音声設定 -->
                <Grid Grid.Row="2" Grid.Column="1">
                    <Grid.ColumnDefinitions>
                        <ColumnDefinition Width="Auto"/>
                        <ColumnDefinition Width="*"/>
                    </Grid.ColumnDefinitions>
                    <!-- テキスト読み上げ or 音声ファイル の選択 Switch -->
                    <Switch x:Name="useSpeechText" IsToggled="{Binding UseSpeechText}" />
                    <Grid Grid.Column="1">
                        <!-- 音声ファイルを使用ラベル -->
                        <Label Text="音声ファイルを使用"
                            HorizontalOptions="Fill" VerticalOptions="Center" HorizontalTextAlignment="Start"
                            TextColor="Black" FontAttributes="Bold"/>
                        <!-- テキスト読み上げのテキスト -->
                        <Editor Text="{Binding SpeechText}"
                            HorizontalOptions="Fill"
                            IsVisible="{Binding IsToggled, Source={x:Reference useSpeechText}" BackgroundColor="White"/>
                    </Grid>
                </Grid>
            </Grid>
        </Grid>
    </ContentPage.Content>
</ContentPage>

デバッグ実行

デバッグ実行をします。
」 や 「」 ボタンで画面上部中央のタイマー設定が変更されればこのページは完了です。

08.メッセージング

ViewModel は View を参照しないことが理想です。
しかし、処理の結果などをデータバインディングでは実現できない形で View に反映したいことがあります。例えば

  • メッセージダイアログの表示
  • 問い合わせダイアログの表示
  • 画面遷移

などが代表例です。これらは、メッセージングで実現します。

メッセージング概要

メッセージングは処理を起動する側がメッセージ管理者へメッセージ送信を依頼し、メッセージ管理者はメッセージの購読をメッセージ管理者へ登録している購読者へメッセージを送信します。
これによりメッセージの送信側とメッセージの購読側の関係が疎に保たれます。

今回の方針

今回はメッセージングは、ViewModel と View の接続のうちデータバインディングでは実現が難しい要素

  • 問い合わせダイアログの表示
  • 画面遷移

の場面で利用します。

メッセージの送信

MessagingCenter クラスの Send メソッドによりメッセージを送信します。
3 つ目の引数には購読側へ渡すパラメーターを設定できます。今回はダイアログに表示するメッセージなどを設定します。

MessagingCenter.Send(this, "DisplayAlert", alertParameter);

メッセージの購読

MessagingCenter クラスの Subscribe メソッドによりメッセージを購読します。
3 つ目の引数にはメッセージを受信した際に呼び出されるメソッドを設定します。

MessagingCenter.Subscribe<ViewModels.MainPageViewModel, AlertParameter>(this, "DisplayAlert", DisplayAlert);

また、メッセージの購読は購読者を MessagingCenter へ登録しますので、必要がなくなったら登録を解除しなければなりません。

MessagingCenter.Unsubscribe<ViewModels.MainPageViewModel, AlertParameter>(this, "DisplayAlert");

パラメータークラスの作成

MyTimer プロジェクト (共有コードプロジェクト) に AlertParameter クラスを作成します。
クラスの作成方法は [背景画像の表示] で学んでいます。思い出しながら作成してください。

パラメーター用のクラスは渡す値をプロパティとして持ったプレーンなクラスです (Plain Old CLR Object・POCO とも呼ばれる) 。 今回は次のコードで AlertParameter.cs ファイルの内容を上書きしてください。

using System;
using System.Collections.Generic;
using System.Text;

namespace MyTimer
{
    // アラートダイアログ表示メッセージのパラメーター
    class AlertParameter
    {
        // 表示するアラートダイアログのタイトルを取得または設定する
        public string Title { get; set; }
        // 表示するアラートダイアログのメッセージを取得または設定する
        public string Message { get; set; }
        // 表示するアラートダイアログの OK ボタンのテキストを取得または設定する
        public string Accept { get; set; }
        // 表示するアラートダイアログのキャンセルボタンのテキストを取得または設定する
        public string Cancel { get; set; }
        // 表示するアラートダイアログの選択時に呼ばれる処理を取得または設定する
        public Action<bool> Action { get; set; }
    }
}

問い合わせダイアログの表示(メッセージ送信)

開始ボタンがタップされた際に本当に開始するかを確認するダイアログを表示します。
ボタンがタップされたことによる処理は ViewModel に作成しますが、ダイアログの表示は View に作成します。このため、ViewModel から View へダイアログの表示を依頼しなければなりません。
そこで、メッセージングの出番です。ViewModel からのメッセージ送信を作成します。

MainPageViewModel.csStart メソッドを次のように変更します。

・変更前

// 開始ボタンが押された際の処理
private void Start()
{
}

・変更後

// 開始ボタンが押された際の処理
private void Start()
{
    // タイマーを実行してよいかを問い合わせる Alert メッセージの設定
    var alertParameter = new AlertParameter()
    {
        Title = "確認",
        Message = "タイマーを開始します。よろしいですか?",
        Accept = "開始する",
        Cancel = "開始しない",

        // アラートメッセージで「開始する/開始しない」選択後の処理
        Action = result =>
        {
            // 「開始する」の場合、タイマーのカウント画面へ移動するようメッセージを送信
            if (result)
                MessagingCenter.Send(this, "Start");
        }
    };

    // アラートメッセージを表示するようメッセージを送信
    MessagingCenter.Send(this, "DisplayAlert", alertParameter);
}

問い合わせダイアログの表示(メッセージ購読の登録)

View 側でメッセージの購読を登録します。
メッセージは画面が表示されている場合に購読し、表示されなくなったら購読を解除します。
購読の登録と解除は、View の Appearing イベントで登録を、Disappearing イベントで解除を行います。

・View へのイベントハンドラの登録
MainPage.xamlContentPage 要素の属性に次のコードを追加します。

Appearing="MainPageAppearing"
Disappearing="MainPageDisappearing"

追加後の ContentPage 要素の属性は次のようになります。

<ContentPage xmlns="http://xamarin.com/schemas/2014/forms"
             xmlns:x="http://schemas.microsoft.com/winfx/2009/xaml"
             xmlns:local="clr-namespace:MyTimer"
             x:Class="MyTimer.MainPage"
             xmlns:vm="clr-namespace:MyTimer"
             Appearing="MainPageAppearing"
             Disappearing="MainPageDisappearing"
             Title="オリジナルタイマーアプリ">

・コードビハインドでのイベントハンドラの追加
View のコードビハインドに Appearing イベントで登録を、Disappearing イベントのハンドラメソッドを追加します。
コードビハインドにはなるべくコードを書かないことが望ましいですが、そのためにはいくつかのライブラリを利用する必要があります。今回はなるべくライブラリの追加をしない素の Xamarin.Forms で作りますので、多少はコードビハインドへの記述が必要になります。

MainPage.xaml.csMainPage クラスに次のメソッドを追加します。

// 画面が表示されたタイミングでの処理
private void MainPageAppearing(object sender, EventArgs e)
{
    // メッセージの購読を設定する
    // アラートダイアログ表示メッセージを購読する
    MessagingCenter.Subscribe<ViewModels.MainPageViewModel, AlertParameter>(this, "DisplayAlert", DisplayAlert);
    // タイマースタートのメッセージを購読する
    MessagingCenter.Subscribe<ViewModels.MainPageViewModel>(this, "Start", StartTimer);
}

// 画面が表示されなくなったタイミングでの処理
private void MainPageDisappearing(object sender, EventArgs e)
{
    // メッセージの購読を解除する
    MessagingCenter.Unsubscribe<ViewModels.MainPageViewModel, AlertParameter>(this, "DisplayAlert");
    MessagingCenter.Unsubscribe<ViewModels.MainPageViewModel>(this, "Start");
}

・メッセージ受信時の処理メソッドの追加
View のコードビハインドにメッセージ受信時の処理メソッドを追加します。
MainPage.xaml.csMainPage クラスに次のメソッドを追加します。

// アラートダイアログを表示する
 private async void DisplayAlert<T>(T sender, AlertParameter arg)
{
    // アラートダイアログを表示する
    var isAccept = await DisplayAlert(arg.Title, arg.Message, arg.Accept, arg.Cancel);
    // アラートダイアログでのユーザーの選択結果い応じた処理を実行する
    arg.Action?.Invoke(isAccept);
}

// タイマーをスタートする
private void StartTimer<T>(T sender)
{
}

ここまでの手順で現在の MainPageViewModel.cs は次のようになっています。

using System;
using System.Collections.Generic;
using System.Text;
using Xamarin.Forms;

namespace MyTimer
{
    // 起動直後のタイマー設定画面の ViewModel
    class MainPageViewModel : BindableBase
    {
        // **画面の値とバインディングするプロパティ**

        // タイマー時間
        private TimeSpan _time = TimeSpan.FromMinutes(5);
        public TimeSpan Time { get { return _time; } set { SetProperty(ref _time, value); } }

        // タイマー時間経過後の案内音声
        private string _speechText = "Time haspassed";
        public string SpeechText { get { return _speechText; } set { SetProperty(ref _speechText, value); } }

        // タイマー時間経過後に案内音声を使うか?(使わない場合、Audio 再生)
        private bool _useSpeechText = true;
        public bool UseSpeechText { get { return _useSpeechText; } set { SetProperty(ref _useSpeechText, value); } }


        // **画面のボタンとバインディングするコマンド**

        // 開始ボタンが押された
        public Command StartCommand { get; }

        // 秒 +/- ボタンが押された
        public Command AddSecondsCommand { get; }

        // 分 +/- ボタンが押された
        public Command AddMinutesCommand { get; }


        // **複数個所で行われる処理をメソッド化したメソッド**

        // object (中身は string) を long に parse する
        private long ParseLong(object arg)
        {
            if (long.TryParse(arg?.ToString(), out var value))
                return value;
            return default(long);
        }

        // タイマー時間を追加する
        private void AddTime(long seconds)
        {
            var newTime = Time.TotalSeconds + seconds;

            // 必ず 1 秒以上 60 分未満となるよう調整する
            newTime = Math.Max(1, newTime);
            newTime = Math.Min((60 * 60) - 1, newTime);

            Time = TimeSpan.FromSeconds(newTime);
        }


        // **コマンドの中身となるボタンが押された際の処理メソッド**

        // 秒 +/- ボタンが押された際の処理
        private void AddSeconds(object parameter)
        {
            long value = ParseLong(parameter);
            AddTime(value);
        }

        // 分 +/- ボタンが押された際の処理
        private void AddMinutes(object parameter)
        {
            long value = ParseLong(parameter);
            AddTime(value * 60);
        }

        // 開始ボタンが押された際の処理
        private void Start()
        {
            // タイマーを実行してよいかを問い合わせる Alert メッセージの設定
            var alertParameter = new AlertParameter()
            {
                Title = "確認",
                Message = "タイマーを開始します。よろしいですか?",
                Accept = "開始する",
                Cancel = "開始しない",

                // アラートメッセージで「開始する/開始しない」選択後の処理
                Action = result =>
                {
                    // 「開始する」の場合、タイマーのカウント画面へ移動するようメッセージを送信
                    if (result)
                        MessagingCenter.Send(this, "Start");
                }
            };

            // アラートメッセージを表示するようメッセージを送信
            MessagingCenter.Send(this, "DisplayAlert", alertParameter);
        }

        // **コンストラクタ**

        // コンストラクタ
        public MainPageViewModel()
        {
            // コマンドの設定
            // readonly プロパティの初期化は、コンストラクタ内でも行える
            AddSecondsCommand = new Command(AddSeconds);
            AddMinutesCommand = new Command(AddMinutes);
            StartCommand = new Command(Start);
        }
    }
}

現在の MainPage.xaml は次のようになっています。

<?xml version="1.0" encoding="utf-8" ?>
<ContentPage xmlns="http://xamarin.com/schemas/2014/forms"
             xmlns:x="http://schemas.microsoft.com/winfx/2009/xaml"
             xmlns:local="clr-namespace:MyTimer"
             x:Class="MyTimer.MainPage"
             xmlns:vm="clr-namespace:MyTimer"
             Appearing="MainPageAppearing"
             Disappearing="MainPageDisappearing"
             Title="オリジナルタイマーアプリ">
    <!-- ViewModel を設定、構築 -->
    <ContentPage.BindingContext>
        <vm:MainPageViewModel />
    </ContentPage.BindingContext>

    <!-- ページの表示内容 -->
    <ContentPage.Content>
        <Grid>
            <!-- 背景画像 -->
            <Image Source="{local:ImageResource MyTimer.Resources.Background.png}" Aspect="AspectFit" />

            <Grid BackgroundColor="#80FFFFFF">
                <Grid.RowDefinitions>
                    <RowDefinition Height="*"/>
                    <RowDefinition Height="Auto"/>
                    <RowDefinition Height="40"/>
                </Grid.RowDefinitions>
                <Grid.ColumnDefinitions>
                    <ColumnDefinition Width="Auto"/>
                    <ColumnDefinition Width="*"/>
                </Grid.ColumnDefinitions>

                <!-- 設定中のタイマー時間表示 -->
                <Label Text="{Binding Time, StringFormat='{0:mm\\:ss}'}"
                    Grid.ColumnSpan="2"
                    HorizontalOptions="Center" VerticalOptions="Center"
                    FontSize="Large" TextColor="Black" FontAttributes="Bold"/>

                <!-- タイマー開始ボタン -->
                <Button Text="タイマー開始" Command="{Binding StartCommand}" 
                    Grid.Row="1" Grid.RowSpan="2"
                    BackgroundColor="#80808080"/>

                <!-- タイマー時間の + - ボタン達 -->
                <StackLayout Orientation="Horizontal"
                    Grid.Row="1" Grid.Column="1"
                    HorizontalOptions="Center">
                    <!-- 分の + - ボタン達 -->
                    <StackLayout>
                        <!-- 「分」 ラベル -->
                        <Label Text="分" HorizontalOptions="Center" TextColor="Black" FontAttributes="Bold"/>
                        <!-- + - ボタン達  -->
                        <StackLayout Orientation="Horizontal">
                            <!-- 10の位設定 -->
                            <StackLayout>
                                <Label Text="10" HorizontalOptions="Center" TextColor="Black" FontAttributes="Bold"/>
                                <Button Text="+" Command="{Binding AddMinutesCommand}" CommandParameter="10" BackgroundColor="#80808080"/>
                                <Button Text="ー" Command="{Binding AddMinutesCommand}" CommandParameter="-10" BackgroundColor="#80808080"/>
                            </StackLayout>
                            <!-- 1の位設定 -->
                            <StackLayout>
                                <Label Text="1" HorizontalOptions="Center" TextColor="Black" FontAttributes="Bold"/>
                                <Button Text="+" Command="{Binding AddMinutesCommand}" CommandParameter="1" BackgroundColor="#80808080"/>
                                <Button Text="ー" Command="{Binding AddMinutesCommand}" CommandParameter="-1" BackgroundColor="#80808080"/>
                            </StackLayout>
                        </StackLayout>
                    </StackLayout>
                    <!-- 秒の + - ボタン達 -->
                    <StackLayout>
                        <!-- 「秒」 ラベル -->
                        <Label Text="秒" HorizontalOptions="Center" TextColor="Black" FontAttributes="Bold"/>
                        <!-- + - ボタン達  -->
                        <StackLayout Orientation="Horizontal">
                            <!-- 10の位設定 -->
                            <StackLayout>
                                <Label Text="10" HorizontalOptions="Center" TextColor="Black" FontAttributes="Bold"/>
                                <Button Text="+" Command="{Binding AddSecondsCommand}" CommandParameter="10" BackgroundColor="#80808080"/>
                                <Button Text="ー" Command="{Binding AddSecondsCommand}" CommandParameter="-10" BackgroundColor="#80808080"/>
                            </StackLayout>
                            <!-- 1の位設定 -->
                            <StackLayout>
                                <Label Text="1" HorizontalOptions="Center" TextColor="Black" FontAttributes="Bold"/>
                                <Button Text="+" Command="{Binding AddSecondsCommand}" CommandParameter="1" BackgroundColor="#80808080"/>
                                <Button Text="ー" Command="{Binding AddSecondsCommand}" CommandParameter="-1" BackgroundColor="#80808080"/>
                            </StackLayout>
                        </StackLayout>
                    </StackLayout>
                </StackLayout>

                <!-- カウント後の音声設定 -->
                <Grid Grid.Row="2" Grid.Column="1">
                    <Grid.ColumnDefinitions>
                        <ColumnDefinition Width="Auto"/>
                        <ColumnDefinition Width="*"/>
                    </Grid.ColumnDefinitions>
                    <!-- テキスト読み上げ or 音声ファイル の選択 Switch -->
                    <Switch x:Name="useSpeechText" IsToggled="{Binding UseSpeechText}" />
                    <Grid Grid.Column="1">
                        <!-- 音声ファイルを使用ラベル -->
                        <Label Text="音声ファイルを使用"
                            HorizontalOptions="Fill" VerticalOptions="Center" HorizontalTextAlignment="Start"
                            TextColor="Black" FontAttributes="Bold"/>
                        <!-- テキスト読み上げのテキスト -->
                        <Editor Text="{Binding SpeechText}"
                            HorizontalOptions="Fill"
                            IsVisible="{Binding IsToggled, Source={x:Reference useSpeechText}" BackgroundColor="White"/>
                    </Grid>
                </Grid>
            </Grid>
        </Grid>
    </ContentPage.Content>
</ContentPage>

現在の MainPage.xaml.cs は次のようになっています。

using System;
using System.Collections.Generic;
using System.Linq;
using System.Text;
using System.Threading.Tasks;
using Xamarin.Forms;

namespace MyTimer
{
    // 起動直後の画面。タイマー設定を行う画面
    public partial class MainPage : ContentPage
    {
        // コンストラクタ
        public MainPage()
        {
            InitializeComponent();
        }

        // 画面が表示されたタイミングでの処理
        private void MainPageAppearing(object sender, EventArgs e)
        {
            // メッセージの購読を設定する
            // アラートダイアログ表示メッセージを購読する
            MessagingCenter.Subscribe<MainPageViewModel, AlertParameter>(this, "DisplayAlert", DisplayAlert);
            // タイマースタートのメッセージを購読する
            MessagingCenter.Subscribe<MainPageViewModel>(this, "Start", StartTimer);
        }

        // 画面が表示されなくなったタイミングでの処理
        private void MainPageDisappearing(object sender, EventArgs e)
        {
            // メッセージの購読を解除する
            MessagingCenter.Unsubscribe<MainPageViewModel, AlertParameter>(this, "DisplayAlert");
            MessagingCenter.Unsubscribe<MainPageViewModel>(this, "Start");
        }

        // アラートダイアログを表示する
        private async void DisplayAlert<T>(T sender, AlertParameter arg)
        {
            // アラートダイアログを表示する
            var isAccept = await DisplayAlert(arg.Title, arg.Message, arg.Accept, arg.Cancel);
            // アラートダイアログでのユーザーの選択結果い応じた処理を実行する
            arg.Action?.Invoke(isAccept);
        }

        // タイマーをスタートする
        private void StartTimer<T>(T sender)
        {
        }

    }
}

デバッグ実行

デバッグ実行をします。
[タイマー開始] ボタンをタップし次のように表示されたらこのページは完了です。
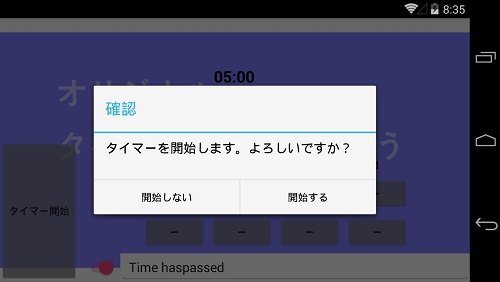
f:id:rksoftware:20180520115629j:plain
※OS や バージョンによって見た目は大きく異なります。

09.画面遷移

画面遷移はプラットフォーム毎に様々なスタイルがあります。
Xamarin.Forms では、新しいページを作り今のページの上に重寝て表示するイメージの実装になっています。

画面遷移のコード

画面遷移をするには Navigation オブジェクトの Push~ メソッドを実行します。 その際、Push~ メソッドの引数には次のページのインスタンスを設定ます。
Push~ メソッドは複数ありますが、今回は PushModalAsync を使用します。

コードは次のようになります。

this.Navigation.PushModalAsync(new CountDownPage());

次のコードを MainPage.csStartTimer メソッドの中に追加します。

// タイマー画面へ遷移する
this.Navigation.PushModalAsync(new CountDownPage());

Start メソッド全体は次のようになります。

// タイマーをスタートする
private void StartTimer<T>(T sender)
{
    // タイマー画面へ遷移する
    this.Navigation.PushModalAsync(new CountDownPage());
}

画面遷移のパラメーター

今回のアプリは 1 ページ目がタイマーの設定、2 ページ目がタイマーのカウント (実行) 画面になっています。
1 ページ目で行った設定を 2 ページ目に渡す必要があります。設定をページ間で共有する方法はいくつかありますが、今回シンプルなアプリなのでコードの短い static インスタンスの共有で実装します。

パラメータ設定クラスの作成

MyTimer プロジェクト(共有コードプロジェクト)に TimerSettings クラスを作成します。
クラスの作成方法は [背景画像の表示] で学んでいます。思い出しながら作成してください。

パラメーター設定のクラスは、画面間で共有するプロパティとして持ったプレーンなクラスです。

今回は次のコードで TimerSettings.cs ファイルの内容を上書きしてください。

using System;
using System.Collections.Generic;
using System.Text;

namespace MyTimer
{
    // タイマー設定保持クラス
    class TimerSettings
    {
        // アプリ内で単一のインスタンスを取得する
        // タイマー設定はアプリで一つだけ保持する
        public static TimerSettings Instance { get; } = new TimerSettings();

        // コンストラクタ
        // 外部でインスタンス化できないよう private にする
        private TimerSettings() {; }

        // カウントする時間を取得または設定する
        public double CountMilliseconds { get; set; }
        // カウント終了時に読み上げるテキストを取得または設定する
        public string SpeechText { get; set; }
        // カント終了時にテキストを読み上げるか否かを取得または設定する
        public bool UseSpeechText { get; set; }
    }
}

パラメーターの設定

メインページでのパラメータの設定を作成します。
MainPageViewModel.csStart メソッドの先頭に次のコードを追加します。

// タイマー設定の保存
var settings = TimerSettings.Instance;
settings.CountMilliseconds = Time.TotalMilliseconds;
settings.UseSpeechText = UseSpeechText;
settings.SpeechText = SpeechText;

Start メソッド全体は次のようになります。

// 開始ボタンが押された際の処理
private void Start()
{
    // タイマー設定の保存
    var settings = TimerSettings.Instance;
    settings.CountMilliseconds = Time.TotalMilliseconds;
    settings.UseSpeechText = UseSpeechText;
    settings.SpeechText = SpeechText;

    // タイマーを実行してよいかを問い合わせる Alert メッセージの設定
    var alertParameter = new AlertParameter()
    {
        Title = "確認",
        Message = "タイマーを開始します。よろしいですか?",
        Accept = "開始する",
        Cancel = "開始しない",

        // アラートメッセージで「開始する/開始しない」選択後の処理
        Action = result =>
        {
            // 「開始する」の場合、タイマーのカウント画面へ移動するようメッセージを送信
            if (result)
                MessagingCenter.Send(this, "Start");
        }
    };

    // アラートメッセージを表示するようメッセージを送信
    MessagingCenter.Send(this, "DisplayAlert", alertParameter);
}

今の段階では MainPage.csCountDownPage クラスが見つからないというエラーが出ますが、CountDownPage は次の記事で作成します。
次の記事へ続きます。